There is currently a great demand for laptops which provide the user-friendliness of a Mac without the cost and weight of a MacBook or MacBook Pro, or without the cost of size of a MacBook Air.
Given that the ever-increasing varieties of Intel Atom-based netbooks are low-cost and roughly equivalent in hardware terms to the original MacBook Air, they make a tempting target to conversions to “MacBook Mini”s.

Indeed, there are a large (and also increasing) number of guides which will tell you how to get OS X running using a variety of ISO images downloaded via BitTorrent and hacked kernels which then require extensive changes to the installed system and come with copious warnings not to upgrade the OS when Software Updater prompts you to… and even then it’s common for basic functions such as sleep or USB not to work (although it has to be said that no method is entirely free from caveats).
This guide doesn’t work like that. This guide will describe how to install OS X from an original Leopard installation DVD and how to end up with an entirely unmodified system (*) which will not break when Apple issues updates.
DISCLAIMER: Please do not attempt anything you read about below without understanding what you're doing! Following these instructions will erase your hard drive before Leopard is installed, so only continue if you're happy with this and have backups. This guide is written from memory, and I haven't wiped my netbook to confirm every step - although I'm happy to receive feedback about any errors.
This guide is written with the Samsung NC10 in mind, for this is the only netbook I have available to test with. Other netbooks should also work with the same method, but I’ll post updates if I hear of any problems or improvements. This guide does not cover multi-boot systems, although it should be relatively easily achievable for anyone with a working knowledge of boot-loaders.
- What you will need:
-
- An Intel Atom-based netbook with the ability to boot from USB devices;
- A USB data stick or USB hard disc to boot from with 64Mb of free space;
- A USB DVD drive or, alternatively, a 16Gb or larger USB data stick or USB hard disc from which to install Leopard and access to a machine with a DVD drive already running OS X. 1
Some people have reported problems in getting external DVD drives to be recognised, so the current best advice is to image the Leopard DVD onto a USB hard disc, as described below, and install from this; - An OS X-supported WiFi MiniPCI-e card, an OS X-supported internal ethernet adapter, or an Apple MacBook Air USB to Ethernet adapter (or similar);2
- Access to a machine running Windows to start with (although this can be the netbook itself prior to OS X installation, or alternatively a Linux machine);
- A basic knowledge of UNIX command-lines is helpful, but not required.
1 Most (all?) netbooks do not feature an optical drive, so installing Leopard isn’t as simple as just dropping the DVD into a DVD drive… unless you happen to have one handy. If you don’t, then all is not lost – if you have access to another machine running OS X which also has a DVD drive, then you can simply insert the Leopard installation DVD and connect your removable media and launch Disk Utility. Click on the DVD icon on the left and then select the “Restore” tab. Now drag the DVD icon onto the “Source” text-box and your USB hard disc or data stick onto the “Destination” text-box and click “Restore”. Note that the Leopard DVD image is just slightly too large to fit onto an 8Gb data stick
![]()
2 This is probably the greatest hurdle to getting Leopard running on the NC10 in particular, as it is unlucky enough to have both wireless and ethernet adapters which aren’t supported as standard on OS X. If an install is attempted on a stock machine without a USB ethernet adapter, then the first stage will succeed but the user-creation stage will loop endlessly because the OS can’t find a network adapter. It is possible to avoid this by configuring a Bluetooth PAN connection, but since this doesn’t have an ethernet MAC address other problems (and lots of log messages concerning UUIDs) will result.
It is actually possible to get the stock wireless adapter running, but this is a complex process and the result is not stable, so I won’t cover it here. The ethernet adapter is currently a non-starter, with no support in OS X at all. Thus, whilst it is possible to get by with a USB network adapter, by far the best solution is to crack open the chassis and replace the standard MiniPCI-e WiFi card with a Broadcom replacement – Dell TrueMobile cards seem to be the popular choice. I opted for the 802.11BG Dell 1395 over the 802.11ABG Dell 1490 on the assumption that the lack of 802.11A networking, something I’ve never come across in the UK, might lead to some power savings. 802.11N cards also work, but check around first to ensure that there are no hardware incompatibilities with OS X.
- What you will need to download:
- This bit’s easy – you only need a single file: The installation image available from here (8.6Mb), which now includes the Windows syslinux binary, used to make your USB data stick or disc drive bootable. If you need to install from an OS other than Windows, the latest release of syslinux is available from here (but you won’t need this if you do have a Windows machine available to prepare the USB boot data stick).
- What will happen next:
- Firstly we’re going to copy the installation files, which are actually only just over 45Mb in size, to the USB data stick or hard disc. Then syslinux is run from Windows or Linux in order to make the device bootable. Booting from this device allows the Leopard installation to complete. After this, we’ll run a script which automagically performs the system changes necessary to boot without the USB device in place, and… that’s it!
- Preparing the boot device:
- If necessary, start by (re)formatting your USB data stick or disc drive as FAT32. Extract the installation image Zip file, downloaded above, and copy all of the files contained within to the root of the USB device (so that “BOOT“, “BOOT.CAT“, etc. are at the top level of the USB device – not in any subdirectory). Now open a Command Prompt and change directory to your USB device – for example, drive U:. Now run the command:
U:\syslinux -ma U:… to make the drive (U: in this example) bootable.
Note that this command shouldn’t produce any output: if anything appears on-screen, then the process has failed. This can be caused by supplying the wrong drive-letter, or by not running the command with elevated privileges on Windows Vista or Windows 7. In this latter case, “CMD” should be typed into the Start Menu search box and then the ‘CMD’ icon above should be right-clicked and “Run as administrator” should be chosen.
At the very next step, we will be reformatting the drive for use with Leopard – so now would be an excellent time to backup your Windows partition(s), or even swap out the internal hard disc (and wireless). I took the latter approach, and installed a 30Gb OCZ Core Series v2 SSD. The capacity is plenty for my needs (even with a full Xcode install, I still have almost 10Gb of space free) and has the benefits of being totally silent, having no moving parts, consuming less power, and actually performing better than the drive installed as standard!
- Installing Leopard:
- Reboot your netbook with the USB device inserted and enter the BIOS Setup (probably by pressing Escape, F2, or Delete as the machine powers on) and ensure that the following options, if available, are enabled:
- NX / XD / EDB
- HPET
… and also ensure that you change the boot order to place the USB drive before the internal disc drive. The NC10 has two USB sockets on the left and one on the right, and it simplified things greatly to place the bootable USB device in the right-hand socket with the USB DVD drive or larger-capacity USB device on the left.
Now hold your breath, cross your fingers, and allow the system to start to begin installing Leopard!
… almost. First you should see a simple text-mode boot menu where you have to press Enter to confirm booting from the DVD (image). As noted above, the most reliable installation method is currently to boot an image of the Leopard DVD from a USB hard disc (or large USB data stick).
You should now be looking at the Leopard installer’s language select screen. Please email me with details if this isn’t the case. Note that the screen will look strange at this stage, because 800×600 output is being stretched onto a 1024×600 screen.
Instead of proceeding with installation as normal, select your language and then select Disk Utility from the Utilities menu. Choose your internal drive from the list on the left, and then select the Partition tab. Define a single partition covering the entire device, but before applying hit the Options button to pull up the dialog below:

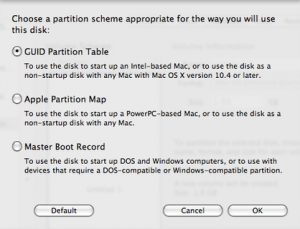
… from where the GUID Partition Table option should be selected. Now continue to select the file system to use and format the newly-created partition. Users of SSD’s should avoid the “Journalled” option (as it will needlessly generate addition wear on the device) and the “Case-sensitive” option, whilst technically correct, should be avoided if planning to run Adobe applications at any point in the future – because Adobe’s inability to consistently use either upper- or lower-case results in breakage when the file system differentiates between the two.
Now, finally, proceed through the installation as normal – being sure to deselect options, such as printer drivers, which would consume a large amount of disk space if space is at a premium such as with an SSD.
Installation should continue successfully until the very last stage when the installer tries to set the partition with the newly-installed OS as the boot volume – which will fail since this is not a real Mac. This is completely normal. Remove the installation DVD but keep the USB boot device inserted and reboot.
- Creating the EFI partition:
- The last stage of this installation method will reformat the 200Mb EFI partition, which is currently otherwise unused (but which the EFI standards say must be formatted as FAT32) as HFS+ to form an alternative boot partition for OS X. Modified override kernel extensions can then be loaded from here before the actual system extensions are seen, allowing Leopard to work transparently on foreign hardware.
You should be looking at the Leopard desktop, and have a drive icon for the bootable USB drive. In here should be a disk image named ‘MacOS Installer.dmg’: open this, and there should be a variety of items including a script named “Installer”. Run this and follow the prompts (the default answers should be sensible) in order to setup your EFI partition.
- Important Note:
-
It has just been brought to my attention that versions of the NC10 with integrated 3G modems have (slightly) different DSDTs to the non-3G models. Therefore, if you have the 3G NC10 then please do not choose to install a DSDT override when prompted by the Installer. There is now a replacement DSDT.aml for 3G editions – if you wish to install the DSDT override then either copy this in to place on your EFI partition manually, or drag it into the mounted ‘MacOS Installer.dmg’ disk-image before running the “Installer” script.
I accidentally wiped out my (real) MacBook Pro when testing the installer, but it did seem that for some reason the /Volumes/EFI/Extensions/ directory had been created, but that the contents of the Extensions directory from the installer image hadn’t been copied across. It’s worth choosing not to reboot, and double-checking that this has succeeded before restarting. It’s best to copy the files across from a Terminal session, and then run /Volumes/EFI/update.sh as root once they are in place. Again, please let me know if this works for you or not.The Version 1.1 update has now been tested on a variety of hardware, and the correct files are being created. The glitch above must have been related to accidentally running the installer on a real Mac. Don’t do it, kids
If the version of Leopard installed isn’t 10.5.6, it would be worthwhile to now apply the 10.5.6 Combo update, as the extensions supplied with the Installer are the 10.5.6 versions, and may not work as expected on earlier releases.
This update can be downloaded from Apple’s Downloads site.
Eject the Installer image and the USB device, and then reboot for the final time (note that you will not see an Apple logo as the system boots from now on – this was removed from the bootloader for code-size reasons), and you should find that you have an all-singing, all-dancing, and mostly functional Leopard machine in front of you!
- Where do we go from here?:
- There are still issues related to running external displays over the VGA port in non-mirrored mode which are unresolved. Audio switching from the headphone jack to the internal speakers is currently a manual job, but forthcoming drivers due soon promise to fix this. Because the touchpad is assumed to be square, the vertical sensitivity is too high, but this is also being worked on. Finally, scripts are needed to change the brightness level as this can’t be done with the function keys. And yes, the Euro key on Fn+F3 really does output “0128″ instead of anything useful <sigh>.
At the time of writing, none of the SMBIOS replacement extensions work on 10.5.6, so correcting the System Profiler output is not currently possible. Finally, Intel’s EIST is currently unsupported, and extensions which enable this on other Intel processors crash the Atom. Given that the processor’s TDP is a measly 2.5W this isn’t really the big issue it would be on other more powerful systems.
Note that, after going to all of this trouble to get Leopard installed without modifying the installed copy in any way, it’s important to resist the temptation to then go and install any extensions onto the system partition itself – and ignore any instructions which direct you to do so! Any new extensions should be installed instead into the Extensions directory on the EFI partition, and the update.sh script in the root of this partition must be run after any change.
Two excellent tips from the ever-useful MacOSXHints.com are:
- Disable Safe Sleep, aka Hibernation – which doesn’t work with the current version of efi_boot, although support is already working in other bootloaders and is promised for the next release of Chameleon. Once Safe Sleep is disabled, /var/vm/sleepimage can be removed to reclaim some disk space.
- Enable remote DVD mounting allows any machine to use 10.5’s new MacBook Air feature of making remote DVD drives appear local for software installation purposes.
Apple updates should all be fine, although Snow Leopard (OS X 10.6), being 64bit (and the Atom N270 being 32bit only), is an unknown quantity. There are currently rumours of an Atom-based Mac Mini update or even an official Apple netbook, either of which could vastly improve the, already very good, hardware support for this platform.
If/when Apple to release further Mac OS updates, or when upgrading to 10.5.6 initially, it’s well worth making a (Time Machine?) backups first. I’d then advise downloading the Combo Update from Apple’s support site rather than installing the Delta update offered through Software Update. It’s well known that running “Verify Disk Permissions” can throw back warnings after installing a Delta update, whilst this doesn’t happen after applying a (more comprehensive) Combo update.
- Update:
- Version 1.1 of the installer fixes several problems, including preventing the Quiet boot plist from being given the wrong name and fixing the location of the log files which are created during the install. Anyone who has already downloaded the original release should upgrade to this version and re-run the installer if any problems were encountered previously.
* Almost
January 30th, 2009 at 9:26 am
How do you get to your EFI partition once you’ve created it?
Here’s a simple script that can be run as a standard user to correctly mount the file system:
January 30th, 2009 at 9:32 am
These changes will reduce the scale of the named applications in order to make them fit on the relatively low-resolution screen (although reducing the scale of System Preferences too much can lead to some nasty tearing as it resizes):
Isn’t automatic per-application scaling neat?
February 1st, 2009 at 11:46 am
A working graphical sound-switching application for the NC10:
http://blog.stuart.shelton.me/downloads#Audieee-NC10.dmg
February 3rd, 2009 at 7:50 am
Hi Stuart,
Would you be able to make a Chameleon DFE for Hard Disk for the Samsung NC10?
If you make this I will be able to install OSX Retail after my XP partition by modifiying my Retail disc the install on MBR partitions.
Please can you let me know
Thank you for your time
NSCXP2005
February 3rd, 2009 at 8:00 am
NSCXP2005: I have no idea!
I have heard talk, though, of imaging the retail DVD to a USB stick/drive, and then modifying this image directly and hacking the OS X Installer to allow installation to an MBR disc. What needs to be done in order for this to work, I don’t know… I’m personally still leery about modifying the boot media (on the basis that it could cause any sort of obvious or subtle breakage down the line), but I can certainly understand why people are keen to do so for multiboot purposes.
On the other hand, I believe that Vista and Windows 7 both accept GUID partition tables (as part of their EFI support) and so could presumably be successfully multibooted alongside OS X on a GUID drive without further changes…
February 3rd, 2009 at 2:03 pm
Hi Stuart, I have just followed your guide to the letter t but upon ejecting my USB stick for final reboot, upon rebooting my computer gets to the grey screen where the apple logo should be but it isnt there, only the spinning circle is present. It then moves onto a blank blue screen which of course would normally be the login screen. Do you have ideas what might be the problem? The computer boots into osx perfect if i plug the usb stick back in but has the afore mentioned problems when it is removed. Im trying to find out how to access the volumes folder to make sure all files were copied over from the usb stick but this is proving difficult. Sorry for my lack of intelligence with hackintosh’s, im fairly new.
February 3rd, 2009 at 2:15 pm
PS. when i launched the installer on the usb, i told it to launch the computer in quiet mode but the computer still launches with the darwin menu asking which OS i want to boot.
February 3rd, 2009 at 5:00 pm
The latest release of efi_boot removes the Apple logo to make room for the DSDT override code, so having no logo but a spinner is absolutely fine… I should probably mention this in the article.
I’m not sure why you’re still prompted for which OS to boot – but in this case, this is a good thing!Could you confirm that you have updated your installation to 10.5.6 whilst running booted from the USB key? The included graphics drivers are 10.5.6 versions, and so this problem could be expected if running from an earlier 10.5.x release.
When you’ve booted from USB, could you please do the following:
With this done, please unmount the EFI partition (“sudo umount /Volumes/EFI“), reboot the system without the USB key inserted, and this time at the boot prompt type (only) “-f -v” and watch to see whether there are any obvious errors.
Edit: This should all be fixed in the 1.1 update
Thanks for helping to improve this guide!
February 3rd, 2009 at 6:36 pm
Hi Stuart,
Ive replied via email as my reply was quite long winded. Thanks for all your help to date by the way!
Cheers
February 4th, 2009 at 4:55 pm
I’ve uploaded version 1.1 of the installation utilities – this release not only fixes the problem with the mis-named quiet boot plist, but also gives more verbose information regarding what is actually happening and corrects a bug regarding where certain output is logged to.
(I’ve also re-ordered these comments a little so that they read more naturally, and I’ll now enable Wordpress 2.7’s funky new Threaded Comments functionality)
Stephen: Please download this update and re-run the installation (as a “New Install”) from the new image, and see if any errors are reported by the installler.
February 4th, 2009 at 5:45 pm
Hi Stuart,
Thanks for the update. Ive sent you another email last night as my netbook is in reboot hell and I am unable to re-run the OSX installer.
February 5th, 2009 at 6:44 am
somebody can help me with my nc10 ?
- sleep on lid close does not work (on battery), i have ClamshellDisplay.kext installed (from superhai)
- sleep does only work once after each boot. If I try to put the system to sleep for a second time display goes blanc but the system stays partly awake
- weird: using hibernate (pc_efi v9) resets the BIOS !?!! (so the system does not boot because EBD is disabled per default)
the most important issue is the “sleeps only once per boot” issue.
would be great if anyone could help me.
write to nc10 at seb dot exse dot net
BTW: I can confirm that the 3G modem which you can get with the nc10 works perfectly.
although its permanently registered to the network (you can’t turn it off, except with AT commands) it consumes not much energy. Upload and download speeds and ping latency are great if you have a capable network around.
/sebastian
February 5th, 2009 at 6:46 am
maybe somebody who has no sleep problems can supply me with a zipfile containing /System/Library/Extensions (and other modified important stuff, bootloader/kernel/DSDT/…)
February 5th, 2009 at 9:32 am
Sebastian, I don’t have any extensions to automatically sleep on lid close – but this isn’t to say that they won’t work. I just prefer to manually sleep the machine myself, and be able to leave it running with the lid closed.
(I also understand that ClamshellDisplay.kext has problems if power is connected and the lid is closed, constantly sleeping and re-waking. This may well be fixed if/when the sleep-on-power problem is fixed.)
efi_boot is currently the only bootloader (that I’m aware of) which supports overlay extensions on the EFI partition, so I’ve not tried other alternatives. I’ve read about pc_efi’s Hibernate support, but am waiting for the next Chameleon release which promises EFI-overlay support, Hibernate support, and to provide a full graphical boot menu… sounds good!
I’ve not encountered any only-sleep-once issue, but this could well be related to having too many extensions trying to do the same thing, non-10.5.6 compatible extensions, or outdated PowerManagement bundles.
If you look on my downloads page, you’ll find that there’s already an archive of all of the modifications I have installed on my EFI partition!
P.S. Did you get the NC10 version with integrated 3G, or have you fitted it yourself?
February 5th, 2009 at 10:45 am
Hi Stuart,
I was just wondering, if I installed OS X with this guide and completely wipe the Hard Drive, after installing this will I be able to install Windows 7 & Windows XP on the drive?
Also I was wondering about the solution you mentioned that Stephen found. Would you be able to send me the solution to my email address?
Thank you for your time]
All the best
NSCXP2005
February 5th, 2009 at 12:00 pm
I’ve not tried installing any other OS, as I’m using a 30Gb SSD and there really isn’t room!
I’d expect Windows 7 (or indeed Windows Vista) to work, as both (nominally…) support EFI and GPT/GUID-formatted disks.
Since Windows XP doesn’t have EFI support, though, multibooting to it would require hacking OS X to install on an MBR disk – and that in turn could well confuse bootloaders, etc. If you do try it, please let me know how you get on… but I wouldn’t expect it to be easy…
I’m afraid that I was misremembering when I said that Stephen had told me about an alternative approach – I must have heard about it from someone or someone else… and I can’t find where right now
I’ll let you know if it comes back to me.
February 5th, 2009 at 10:04 pm
Stuart: yes it is the UMTS-Modem that came with the NC10.
It is detected as a plain USB-Serial-Device (Modem), so it does not show you signal stength or the network you are connected to, but most of the time this in no problem.
http://www.exse.eu/hspa.jpg
Download and Upload speeds are impressive, power consumtion is very low ( like WLAN). I use skype over it. In most european countries you can get 1GB for 20Euro or less with a prepaid card. In the US it cost about the same, also prepaid. I used it in the US and many european countries already. (in the UK 1GB cost 10 Pound, 7GB 25 Pound – prepaid) – this is so great – true mobility.
I have written a quick and dirty perl script which allows you to change the operator and see signal strength and network type (gprs/umts) (for roaming sometimes there are huge price differences : “3 Like Home” – where roaming costs nothing, so choosing the right operator is sometimes very important)
http://www.exse.eu/wwan.perl
February 5th, 2009 at 11:48 pm
Hi Stuart,
Just wanted to update you on my success with the NC10. I now have everything working! Ha! I am stoked to say the least. I found the problem to be that the bios in the machine keeps disabling the EDB setting which is was causing the reboot loop. One would assume that when the settings are saved in the bios, they should remain that way but for some reason they are not. However, the fact the install is working and fully booting into OSX after your usb stick update makes me a happy man. Regarding the bios, I can only think maybe the battery is on its way out in the machine assuming it has one like you may find in a desktop but I will investigate. Aside from this, I owe you a massive thank you for all your hard work and help. I certainly owe you one for sure! Thanks again
Stephen
February 5th, 2009 at 11:52 pm
PS My Dell 1395 arrived today and worked immediately upon install so thanks again for the advice on that. To anyone else considering a new wifi card, this card works flawlessly!
February 6th, 2009 at 12:25 am
Brilliant news – I’m glad to hear it!
(Regarding the BIOS issue – is it still doing it? That’s weird…)
P.S. The Wifi card does require a modified driver… but by following these installation instructions, this is already set-up and in place.
February 6th, 2009 at 1:58 am
Hi Stuart,
I did a clean install using your installer and a retail 10.5.6 DVD.
- booted from the stick
- installed minimal osx
- installed the EFI Partition using the script inside MacOS Installer.dmg
boots and works fine, except: Sleep )-: )-: )-:
still: as long as hibernate is enabled the BIOS setting for EDB is disabled everytime I sleep. What the F*** !?!!
with Hibernate disabled (via smartsleep.prefpane) this does not happen, but sleep does not work anyway. It works exactly once for every boot. Every first sleep I do after the system is booted works fine, the second sleep works NEVER.
Iam so sad now, I hoped for a good osx system but this is a real showstopper.
Next step is to reinstall Windows to verify that this is not a hardware fault. Damn.
February 6th, 2009 at 2:47 am
repeated sleep works with win on my machine, so no hardware defect.
February 6th, 2009 at 8:22 am
Sebastian you’re saying that, even with Hibernation/Deep Sleep disabled, you still can’t suspend your machine using Fn+Esc more than once per reboot?
This hint documents how to manually disable hibernate:
http://www.macosxhints.com/article.php?story=20070302210328928
(which might be different from what an application does)
Could you email be your /System/Library/SystemConfiguration/PowerManagement.bundle, and I’ll see if there’s any significant difference between that and mine.
February 7th, 2009 at 9:19 am
Hi Stuart,
Just to let you know I managed to install OS X Retail on my NC10 with XP & Windows 7. Everything is running smooth, Thank you for the Boot132 files and this guide.
If you would like information how I did it for your guide, dont hesitate to let me know.
Thank you for your time
All the best
NSCXP2005
February 7th, 2009 at 11:04 am
NSCXP2005 By all means, if you have any improvements, suggestions, or additions then please post them here (if they’re relatively short) or email me and I’ll add the information (if longer).
Many thanks!
February 9th, 2009 at 12:44 pm
This to do to install OS X Retail on MBR Partitions.
1. In order to install on MBR Partitions, i.e if you already have XP installed, you will need to replace OSInstall.mpkg which is located in “\System\Installation\Packages” (please find file attached)
With this file replaced it will allow you to install on a partition that has been formatted for MBR (with MBR it is possible for you to dual boot with XP and older systems.)
2. What you will need to download:
The modified OSXInstall.mpkg can be found here
http://rapidshare.com/files/195937308/OSInstall.mpkg.zip
Chameleon_for_Hard_Disk.dmg can be found here
http://rapidshare.com/files/195938579/Chameleon_for_Hard_Disk.rar
3. After install and the computer has restarted in to OS X, run the following file:
Chameleon_for_Hard_Disk.dmg, this file will install all the require kexts for you to software update your system without losing any features.
If anybody requires any additional information please do not hesitate to comment here and I will help you the best I can.
All the best
NSCXP2005
February 9th, 2009 at 1:16 pm
Please note that the method in the comment above requires modification of both the installation media and the installed system – the latter being specifically what efi_boot was trying to prevent!
Having said this, installing onto a drive using (only) a MBR is necessary to multi-boot Windows XP.
(Whilst GPT/GUID partition tables are backwards-compatible with MBR discs, this is only insofar as installing a place-holder MBR which marks the entire disc as used. There are tools, such as those included with rEFIt which will synchronise the MBR with the actual GPT partitions where possible. rEFIt only works on real Macs, however. Linux, Windows Vista and Windows 7 all have EFI support and so can understand GPT – perhaps the Windows 7 Beta on a GUID-formatted drive is a better option than coaxing Windows XP to work?)
February 10th, 2009 at 7:47 pm
Hello Stuart & Sebastian,
Thank you for the great guide. I was able to install 10.5 and then update to 10.5.6 this afternoon.
I made a few notes…
More info about the BIOS setup and EDB would be helpful to those of us who have never owned a windows box before. The NC10 is the first windows computer. This was a real sticking place for me.
Maybe this will help other people; I was using a new 16gb SanDisk Cruzer stick with U3 as the “16gb or larger data stick”. I knew nothing about U3 and it took me a while to figure out how to format the card. To make a long story short, I could not get the Leopard DVD image onto this new card until I removed U3, with another windows computer, and formatted the stick Mac.
Right now I’m trying to deal with the UMTS modem. I bought the NC10 in Germany for €1 with a two year Vodafone contract. For anyone interested, the seller was http://www.notebooksnochguenstiger.de. I found the deal on ebay.de.
I tried downloading the Vodafone Mobile Connect software for Mac but it was unable to find the modem. I then downloaded the launch2net software from novamedia. I have been using this software for several years with a 15” PB and another Vodafone account. With the demo launch2net software I was able to connect the Vodafone network, but with the GPRS protocol. I know this is not correct. I’m not even given the option to connect with HSDPA/UMTS.
If Sebastian reads this, please, it would be very helpful to me if you could share your connection settings and where you are entering them.
Thanks, Paul (info at klarimage.com)
February 14th, 2009 at 11:07 am
Hi stuart,
do you know the automatic per-application scaling commands for the following programs?
iMovie
iDVD
iWeb
Time Machine
If I remember any more I will ask you.
Thanks
NSCXP2005
February 16th, 2009 at 11:59 am
I found very good modem script info for the modem.
http://www.taniwha.org.uk/
About half way down the page you will find the link…
Generic HSDPA Scripts (20kB): Generic HSDPA
I was able to follow the directions and connect the to Vodafone network in Germany.
February 17th, 2009 at 12:03 pm
Hi Paul,
you don’t need any third party software or modem-script.
Just go to the modem-tab and select the Samsung Modem script. And enter your APN (should be: web.vodafone.de for you, or event.vodadone.de if you are traveling). You need to any some telefphone numer (does not matter what you enter there, but if you enter no number you cannot connect, because osx thinks the modem is not configured.
BTW: last summer you could surf in all of europe using the apn event.vodafone.de FOR FREE. Didn’t check it since then. If you connect to that APN you need the enter a creditcard numer (5 euros for one day), but DNS already works. Just setup a IPoverDNS tunnel, and you have internet for free everywhere in europe
(not really fast, but I was able to make a sip-phone call over it, which is very impressive if you imagine how all these IP packet are tunneld via DNS queries).
This summer I will use a 3 prepaid card, which has no roaming fees in certain countries.
February 18th, 2009 at 10:11 pm
Hi.
Is there a tutorial for the NC10 that shows you how to dual boot with XP?
Or alternatively what additional steps are needed to the above tutorial to dual boot?
many thanks
Saltrock
February 18th, 2009 at 11:15 pm
The problem is that the OS X DVD only wants to install to a GUID/GPT formatted EFI-capable disk, whereas Windows XP doesn’t understand EFI and wants an MBR-based disk format.
NSCXP2005 explains above how Windows and Mac OS can be installed onto the same disk by modifying the installation image.
As an alternative that I’ve not investigated, I believe that the (real) Mac boot utility ‘rEFit‘ has a tool to synchronise a GUID Partition Table to a Master Boot Record: usually, a GPT-formatted disk has a placeholder MBR which marks the entire disk as covered by one EFI partition which older OS don’t understand, but do know to avoid. However, a GPT disk of up to three partitions can be synchronised back to the MBR entirely accurately, so there’s no reason why OS X can’t see a properly formatted GPT disk whilst Windows XP simultaneously sees a properly formatted MBR disk (with some unusable partitions and gaps between the defined partitions). All that’s required is a partition editor which can synchronise between GPT and MBR partition layouts… does rEFIt use some variant of gparted?
Also see this hint.
Update: Looks as if someone beat me to it
http://netkas.org/?p=39
http://forum.netkas.org/index.php/topic,2.0.html
February 21st, 2009 at 7:57 pm
Hello NSCXP2005,
Would you be willing to share how you were able to dual boot? I have been able to install and boot OS X by following the instructions. I have also been able to install XP, and then install OS X on a 2nd partition by using the modified OSXInstall.mpkg. When I do this I must boot from the USB stick, and then I can not boot XP.
This is as far as I get. I’ve been trying to read and understand what to do next, but I just don’t get it.
Thanks, Paul (info at klarimage.com)
March 7th, 2009 at 10:54 pm
Hi Paul,
Sorry I haven’t got back to you, I have not been on this site for a while.
Do you have MSN Messenger? if you do can you post you username and I will run you through the procedure.
All the best
NSCXP2005
March 9th, 2009 at 5:09 pm
A method has been discovered which activates the internal Ethernet socket on the NC10
With this driver, a replacement wireless adapter is no longer needed for the post-Installation Setup stage of OS X to complete.
However, the new driver (which is simply the OS 10.5.7 AppleYukon2 driver, which installs correctly into OS 10.5.6) can’t read the system’s MAC address. Since this is used throughout the OS as well as for Time Machine backups and networking, I’m holding off from integrating this until the problems can be fixed.
With OS 10.5.7 being due soon, it may well make sense to sort out any installation glitches with this first, and then update everything at once.
March 12th, 2009 at 11:22 am
Hello NSCXP2005,
I’m not on MSN. I use Skype, username: pda4de
You can send me an e-mail, info (at) klarimage.com
Thanks, Paul
March 19th, 2009 at 12:52 pm
Hi Paul,
I will contact you tonight.
All the best
NSCXP2005
March 22nd, 2009 at 11:03 am
Hey please don’t do this via mail. I also got a NC10 and I wanted to install OSX and Windows XP on that great netbook.
So how do we make a dualboot on NC10 with the original OSX dvd? (mabye a little patched ^^)
Anybody can make a little tutorial how this works? As long as not anything works on OSX+NC10 I want to leave XP on that baby for the things I can’t do with osx
Best regards
s.
March 23rd, 2009 at 1:21 am
Hey Stuart i’m a UK version NC10 owner too, just wanted to leave a big THANK YOU for ur guide! Leopard i rocking on my machine!
Did you sorted the brightness keys issue?
March 26th, 2009 at 1:56 am
> Socke wrote: So how do we make a dualboot on NC10 with the original OSX dvd? (mabye a little patched ^^)
Use the first part of this guide to setup for dual boot on your NC10:
http://mysticus.titanous.com/forum/viewtopic.php?f=26&t=30
Then choose either Stuart’s install or the Mysticus install.
March 28th, 2009 at 12:58 pm
Hi Stuart.
Thank you for the invaluable info. I now have a fully working (almost!) mac netbook. The one issue that plagues me is the sound. It crackles and breaks up. I have reinstalled the AppleAzaliaAudio.kext but it makes no difference. Any ideas? Is this the best audio extension? Any help would be much appreciated. Best regards, Derek
March 28th, 2009 at 6:34 pm
I’m not aware of any problem with this… are you using the AppleAzaliaAudio kernel extensions included with the Installer package, or one which you found elsewhere?
If you’ve got the volume set to full then you could try reducing it – the NC10 speakers are tiny, and don’t sound great (at full volume).
I’ve also noticed a bug difference in sound quality simply by ensuring that the speaker ports on the bottom of the machine at the front aren’t covered, and that tilting the machine backwards can really help!
April 3rd, 2009 at 6:47 am
Installation seemed to go properly, but I’m having no luck creating the EFI partition. With syslinux boot drive (only) connected, and internal HD boot disabled via BIOS, it boots into the Welcome screen (registration). I can select country, then keyboard layout, then opt out of migrating data — but from there it just cycles back to the Welcome screen. Hello, infinite loop!
Anyone know what’s going on?
April 5th, 2009 at 3:14 pm
To Johnny V: Which first part? From the page your link is pointing to, I can not figure this out (Sorry!).
April 6th, 2009 at 2:08 am
Thanks for this great guide. I am up and running, too. My only gripes (minor ones) would be the brightness and the media card slot not working (which I haven’t heard anyone else complain about – is it just me?). These are minor though, as everything I really *need* is there. I’ll be watching to see if anything happens with the brightness. Thanks much!
April 6th, 2009 at 8:17 am
Kevin, the SD card slot should work – although you do have to plug in cards quite firmly and sometimes it does take a second or so before the device icon appears on the desktop.
(Some of the hacked distributions which modify the installed OS use a custom kernel or USB kernel extension, and these often have problems with the card reader. An EFI install should not be affected by this.)
Regarding brightness, it’s worth changing the BIOS brightness setting to “Auto” to have the display automatically brighten and dim (after a suspend/resume cycle or on boot) when on mains or battery. For more control, there are shell scripts and AppleScript applications which will allow you to set the brightness to whatever level you want. I’ll post the shell script I use here shortly…
April 6th, 2009 at 2:25 pm
I successfully got Leopard running on my NC10, by following your instructions. (And thanks very much for putting together such a user-friendly guide.)
I’m rather a n00b to all this, though, and I know nothing about the kexts or what parts of your EFI partition you’ve modified. (Though, I did try to simply copy your archived EFI partition over my own, and subsequently broke it – but was able to repair with the USB boot device.) I do know that I’ve downloaded Audieee from your link, and no matter what I do, I can’t get the sound to come from anywhere but the internal speakers.
Is there some sort of tutorial or easy instruction you can point me to on how exactly to install these kexts (and where), and would you maybe have a list of things your EFI modifications have fixed?
Thanks!
April 6th, 2009 at 2:25 pm
Thanks, Stuart, I’ll look for those scripts and check my BIOS settings. Regarding the card reader, it still doesn’t seem to work. However, I am on one of those new “special edition” NC10’s that Samsung released to Amazon which has the slightly larger trackpad, longer battery, and supposedly a different card reader which supports less formats (Note: I’m *not* talking about the new N110’s which are basically the same as the NC10 with a glossy display). I wonder if that could have anything to do with it?
April 6th, 2009 at 2:39 pm
Stephanie for Audieee (or the brightness-changing utilities you find around the place) to work, the Apple CHUD tools are also required. These can be installed from the Leopard installation DVD by choosing to install the Development Tools.
If you look at the first comment there is a script to mount the EFI partition. With this mounted, place any new extensions into /Volumes/EFI/Extensions (or /Volumes/EFI/Extra/Extensions under Chameleon) and execute /Volumes/EFI/update.sh as root. However, the current installer does include just about everything you need…
It doesn’t have a replacement trackpad driver as the multi-touch enabled driver is still pretty flaky. It also doesn’t have an Ethernet driver, as the current best option defaults the MAC address to 11:22:33:44:55:66 – and since OS X uses this value throughout as a UID, I’m not convinced this is a good idea.
I’m hoping that this might change with the forthcoming 10.5.7, so that will probably be the next installer update (although I will put together a Chameleon installer once the 2.0 final release is available).
April 6th, 2009 at 2:50 pm
Kevin, I didn’t realise that they’d changed anything other than the trackpad!
On the one hand, if the card-reader hardware is altered then it could cause issues… but on the other hand it’s almost certainly still a USB mass-storage device, and so yuo’d expect it to just-work(tm).
The NC10 standard device is already an SDHC-compliant SD card-reader… what does the Special Edition version do differently?
(P.S. Non-reflective matt screens FTW
)
April 6th, 2009 at 4:37 pm
If I’ve followed the directions you’ve written on this page, I’m not using Chameleon, correct?
Does the installer you have linked from this page have the audio stuff and brightness-changing utilities already in? If I install the CHUD tools, what would I have to do to make them work from there?
I don’t think I’ll ever use the ethernet stuff, since I’ve replaced the wifi card with a broadcom one that works marvelously. I suppose the trackpad thing might be nice, but I’m not sure I’m equipped just yet to deal with a flaky driver. (I really want to learn enough to be able to deal with stuff like that, though.)
What would the differences be between the installer on this page and a Chameleon 2.0 installer?
(Thanks ever so much for your help. I hate feeling like the slow kid, but what’s a girl to do?)
-Stef
April 7th, 2009 at 1:36 am
I tried a different SD card and it worked fine. The first card I tried must be bad in some way, so that’s one less minor gripe. I do plan to test hooking up a projector to mirror my screen, so we’ll see how that goes (I believe you said the problems were with screen extension, not mirroring). My auto-brightness is on in my BIOS, so whenever you have a chance to post those brightness scripts, it would be much appreciated. Thanks again for this awesome approach. I was so happy to find a way to use my retail DVD instead of downloading a distribution from a torrent.
I hear you on the matte screens, BUT I have to say I like it on the iMac, especially since I have young kids. My 2nd oldest smashed the lcd on my 12″ powerbook just by poking it too much. But for my NC10, matte all the way!
April 9th, 2009 at 5:29 pm
Hi Stuart,
I am currently having problems with Chameleon v2 as it wont boot XP without a error message & when trying to boot Windows 7 I get a flashing cursor.
It worked fine before I install Chameleon v2, is there any way to get it working but still keep the functionality it had before?
The following error I get on XP is:
Invalid BOOT.INI file
Booting from C:\Windows\
NTDETECT Failed
I am currently using EasyBCD for Windows 7 to boot and that allows me to boot XP & OSX. I would love to use this new loader as it is loads better than the text version.
I hope you can help me.resolve my problems.
Thank you for your time.
All the best
NSCXP2005
April 14th, 2009 at 2:25 am
Using your info, I’m typing this from an NC10 and Leopard! w00t!
Trying to get a handle on dialing up the brightness… seems to be stuck on about 50%. Would you mind posting those scripts you mentioned?
Thanks!
April 14th, 2009 at 3:32 am
I’m also curious what I’m missing for how to get Bluetooth working…. it’s showing in the menu bar as “Not Available”.
Any ideas?
April 14th, 2009 at 2:15 pm
Quick update: Looks like 10.5.6 resolved the brightness and the bluetooth issue. Woot!
April 14th, 2009 at 2:39 pm
I thought it might be helpful to share some feedback on the process from a newbie’s perspective. I’m not a tech person, but I still got things working pretty easily!
Overall, the install went exactly according to plan. I did, however, notice a few things that are important for anyone:
1. Getting the Leopard install disc to be recognized was a trick. I first tried an LG 8x external DVD drive, without luck. The booter just didn’t see it at all. Then I imaged it to my 16gb thumb drive (SanDisk U3 Cruzer) and still no luck. Then I used a 250gb Maxtor Mini external HDD and everything worked swimmingly.
2. I too had the looping Welcome screen problem because I hadn’t yet received my Dell wireless card. I was trying to use the MacBook Air USB>Ethernet dongle instead, but apparently it doesn’t work until you’re into the OS post-install.
3. This may have been mentioned, but to clarify for the n00bs like me: To use Audieee, which does work, you need to have the Developer Tools/CHUD/Xcode installed. On the Leopard install disc (or my imaged HDD in my case), there is an optional install for “Xcode” – apparently this is what you need to install. I was confused by the naming… since there wasn’t a “Developer Tools” or “CHUD” install that I could find!
4. When replacing the wireless card, two things to note: you’ll need to unscrew ALL screws on the bottom of the NC10, with the exception of the one holding the RAM door closed. I wasn’t sure what the markings pointing to some screws and not others meant, but apparently it means nothing for the cover removal!
Also note, the unscrewing process is tough on some of the screws because they use the blue glue when inserting them at the factory. Turn your screwdriver slow and steady but firmly.
5. Be sure to run Software Update ASAP after install as it resolves some issues. I’d forgotten that the CD is only 10.5 (duh).
April 16th, 2009 at 4:13 am
Hi Stuart,
I was wondering if you think this method would work with a DDMAC partition? Or if the unaltered Leopard ISO would fail to mount? I am trying to dual boot XP and OSX without altering the Leopard ISO if possible. This is also my first windows machine (an NC10) so I am not very confident in working on this sort of system.
Thanks!!
April 16th, 2009 at 5:17 pm
If you’d like to make Apple’s Remote Disk function work, here’s how I got it working:
1. On host Mac (the one with the DVD/CD drive), open System Preferences > Sharing and activate “DVD and CD Sharing”. (If you toggle the “ask for permission” checkbox, then when the NC10 tries to connect, the host computer gets a message asking to accept/decline. No password associated.
2. On the NC10, open terminal and run each of these commands:
defaults write com.apple.NetworkBrowser EnableODiskBrowsing -bool true
defaults write com.apple.NetworkBrowser ODSSupported -bool true
That’s it!
April 17th, 2009 at 3:21 pm
How did 10.5.6 resolve the brightness issue? I had a disc with 10.5.6 on it and my brightness cannot be adjusted. When plugged in, it’s great, but when on battery it’s pretty dim. Either way, I can’t manually adjust it.
I also ran into a problem with the VGA out. When I plug into a project, my screen goes haywire and projects the haywire-ness. Fortunately, when you unplug the VGA cable, it goes back to normal right away. I need ideas for this one, because this is a show-stopper for me. I don’t want to revert back to Windows!
April 17th, 2009 at 3:56 pm
Kevin, 10.5.6 doesn’t alter the inability to natively change the brightness level – this still isn’t directly possible. However, there are scripts available that poke at the hardware to do this, as well as a more friendly AppleScript wrapper which can be run from QuickSilver (or similar).
I’ll try to post the shell-script version on the Downloads page shortly…
Due to a driver incompatibility between the GMA950 graphics chipset used on all Mac-compatible Atom-based machines and OS X, display mirroring does not work correctly. This is currently that case with all Atom netbooks and all methods of installing OS X. However, I believe that this does only apply to display mirroring, and that you should be able to use the external display as an Extension without any issues – although I’ve not tested this myself.
April 17th, 2009 at 9:19 pm
Stuart…thank you for your detailed instructions. I’ve had success with my install to 10.5.6 on my NC10 using your EFI method. Naturally, I’m still stuck with a few issues. I’ll ask first about getting full scrolling trackpad functionality. I’ve installed the “trackpad” preference pane and it works fine. I’m wondering about the VoodooPS2 install. I had trouble installing that and am back to square one with just the simple trackpad pane. Does the VoodooPS2 installer work with your EFI method? When I tried installing it, I lost keyboard and trackpad functionality and had some kernel panics on startup. I’ve got that fixed now, via manually removing files and reapplying 10.5.6 update, but would like your opinion on the VoodooPS2 installer, please.
April 18th, 2009 at 5:20 am
If the display extension is possible, there must be something else required to make it work. As soon as I plug the VGA cable into the port on the NC10, the NC10 screen goes bonkers and you can’t see to do anything on the NC10 (like change display settings, etc.). It does project, though, as you can see the same bonkers coming through the projector, including your mouse cursor. I’ll do some poking around on this.
Any scripts you have would be great. I don’t mind going into Terminal to increase the brightness if needed.
April 18th, 2009 at 9:43 am
Larry, I’ve not yet put any serious effort into giving the VoodooPS2 controller a try – I actually use my NC10 for serious development work, so don’t really have time right now to reinstall if it goes wrong.
What I’ve heard about it is pretty much identical to your experience – good when it works, but unstable and prone to causing panics.
Once more testing is complete and the Voodoo team make a stable release, I’ll look again.
(On a similar tack, I did give the VoodooHDA driver a try. This does give (external) microphone input, but has a low maximum volume and distorts badly after resuming from suspend. This should also be good once these kinks are worked out)
April 18th, 2009 at 9:49 am
Kails, I’ve not looked at DDMAC, so I’m afraid that I can’t advise on that.
The problem with mixing Windows XP and unmodified Leopard is that Windows only understands MBR partition-tables, and Leopard requires GUID/GPT. If you have the technical inclination (as as I think I’ve posted in one of the comments above…) it should be possible to adjust the GPT placeholder-MBR to get Windows XP and Leopard working simultaneously, this this is complex and possibly more trouble than it’s worth.
Windows Vista does understand GUID partitions, and so should just work.
Windows 7 has a modified boot process, so whilst it understands the partitions you may have problems using its boot menu to boot other OS. With Chameleon 2, this may no longer be significant…
April 20th, 2009 at 12:24 am
Thank you for your reply, Stuart. I’m going to wait as well and let some of the bugs get worked out for both the trackpad and audio issue before trying it again.
April 20th, 2009 at 11:11 pm
Thanks for this guide.
I’ve been able to successfully install 10.5.6 on my NC10, but it is quite unstable (crash randomly after a couple of minutes, or applications ket killed at startup…)
For beginners like me who don’t RTFM: on the first boot (installation), if the installer reboots before entering the start up screen, use the `-v` boot option: if the installer reboots right after the ‘AppleDecrypt: starting’ message it is likely you have forgotten to enable the ‘EDB’ option in the Samsung NC10 BIOS.
BTW, is it possible to use the Chamaleon 2.0 RC1? Any update?
April 21st, 2009 at 4:46 pm
eblot, this is unusual – all the NC10 owners I’ve heard from have found OS X to be absolutely stable. Have you added additional memory to your machine? If so, are you sure that it is of the correct type and is properly inserted?
I’m running Chameleon 2RC1 right now… but to be honest, other than a shiny graphical boot menu it doesn’t add much over the existing text-mode boot-loader: Hibernation is supported but doesn’t work on the NC10, SMBIOS overrides work but reduce the Atom processor to running at it’s lowest speed – and all other features are equivalent.
Having said that, these are known issues so I’m confident that when Chameleon reaches release status they’ll be fixed – at which point I’ll upgrade the installer to use Chameleon.
As seems to have frequently been the case recently, it looks as if we’re all going to have to hurry up and wait
April 21st, 2009 at 11:04 pm
@Kevin,
Same problems for me when connecting an external monitor. I got it to work once when I dialed down the resolution on the NC10, but it wouldn’t happen a second time. Haven’t been able to get it to work since.
April 22nd, 2009 at 10:03 pm
Stuart,
Do you know how I can install OSX & XP on a GUID partition?
I can install OSX on a GUID partition, but having problems installing XP.
I hope you can help me.
Thank you for your time
All the best
NSCXP2005
April 24th, 2009 at 12:52 pm
Anyone else noticing that video (especially Flash and AVI & WMV via Flip4Mac) run super slow on the NC10? I downloaded an MP4 and it seems to work fine, but even some of the iTunes store videos are really choppy.
Thoughts?
April 24th, 2009 at 3:25 pm
One other question – I noticed in System Prefs, there’s no Trackpad preference pane showing. I’d like to turn off the trackpad when I have a mouse plugged in, but can’t do that with the Trackpad PrefPane gone.
Any ideas? Is there perhaps a Terminal command to do that?
April 24th, 2009 at 4:10 pm
There is a fix for that, but it does require modification of a file on the main System partition (rather than the EFI partition).
I’m afraid that I don’t have the diff handy, but if you modify /System/Library/PreferencePanes/Trackpad.prefPane/Contents/Info.plist to read:
<?xml version="1.0" encoding="UTF-8"?> <!DOCTYPE plist PUBLIC "-//Apple//DTD PLIST 1.0//EN" "http://www.apple.com/DTDs/PropertyList-1.0.dtd"> <plist version="1.0"> <dict> <key>CFBundleDevelopmentRegion</key> <string>English</string> <key>CFBundleExecutable</key> <string>Trackpad</string> <key>CFBundleGetInfoString</key> <string>Trackpad Preference Pane</string> <key>CFBundleIconFile</key> <string>Trackpad.icns</string> <key>CFBundleIdentifier</key> <string>com.apple.preference.trackpad</string> <key>CFBundleInfoDictionaryVersion</key> <string>6.0</string> <key>CFBundleName</key> <string>Trackpad</string> <key>CFBundlePackageType</key> <string>BNDL</string> <key>CFBundleShortVersionString</key> <string>1.1</string> <key>CFBundleSignature</key> <string>????</string> <key>CFBundleVersion</key> <string>1.1</string> <key>NSMainNibFile</key> <string>OldTrackpadTab</string> <key>NSPrefPaneSearchParameters</key> <string>Trackpad</string> <key>NSPrefPanelIconLabel</key> <string>Trackpad</string> <key>NSPrincipalClass</key> <string>Trackpad</string> </dict> </plist>(I think this is right, from memory… if your file already looks like this, let me know and I’ll see if I can find the original method).
After this change is made, reboot and you should have your Preference Pane back…
Lots of people (myself included) have had problems with this change not working for many attempts… and then suddenly doing the right thing for no apparent reason. Once it’s started working it will keep working – but getting there seems a little fragile…
April 24th, 2009 at 10:56 pm
Stuart, looks like my .plist file properties are all the same as you mention in your post. Think you could dig out the original you mention?
Thanks!
April 25th, 2009 at 12:32 pm
Suart,
> Have you added additional memory to your machine?
Yes, and you were right, the memory replacement is the root cause of these issues. I was pretty sure the new 2GB DDR2 memory was working fine, as I run memtest86 for a couple of hours and all tests passed fine, without a single error. As did the memtester tool under Linux!… However, I’ve encountered the same weird application crashes under Linux, so I moved back to the original DDR memory, and now the NC10 is working fine. Thanks. memtest86 is not enough to validate a replacement memory. I should have run OCCT before removing Windows XP from the machine ;-(
So, good news, my NC10 is working fine, and I’ve simplified a bit the installation process: I’ve installed Leopard from a single 8GB USB memory stick (no additional USB stick for booting), and I’ve installed it without any HW modification, that is with the original wired Ethernet Yukon2 driver: it worked fine. I’ve tweaked the driver (as found on some web sites) to use the actual MAC address of the Ethernet device.
I’ve then installed iLife and iWork using the Remote Disc utility.
Thanks for your help !
April 27th, 2009 at 12:01 pm
Ooops, it seems that the latest Software Update breaks Bluetooth support: the blued daemon fails to start, and launchd keeps respawning it forever. It seems to be due to a missing machine identifier.
I’ve re-install Leopard from scratch on an external USB drive connected to the NC10: BT supports works fine till the Software update is applied. On the next reboot, the blued daemon cannot be started anymore.
Any info about this issue?
April 27th, 2009 at 12:10 pm
Hmm – which Software Update caused this?
So far as I’m aware, I’ve installed everything that’s been available up until yesterday, and haven’t had any problems. If you’re getting errors logged regarding being unable to read a UUID, then this is almost certainly the fault, and can be rectified by ensuring that an ethernet adapter of some form (even a Wi-Fi one) is present.
(With a stock NC10, this won’t be the case: The installer doesn’t include an ethernet driver, since there’s currently still no way to automatically determine the correct MAC address, and the stock Wi-Fi card doesn’t work with OS X. The best solution is still to replace the standard Wi-Fi Mini-PCIe card with a Broadcom-based replacement such as one of the Dell TrueMobile 13xx/14xx/15xx cards.)
April 27th, 2009 at 1:37 pm
> Hmm – which Software Update caused this?
I’ve installed 10.5.6 from the official DVD (Mac box set pack), then the Sotware update from yesterday (all of them, no exception)
> If you’re getting errors logged regarding being unable to read a UUID
Actually, it’s a bit different: /usr/sbin/blued try to store a machine id into a dictionary, however the value is NIIL (Obj-C code), which cause a failure, which in turn leds to a blued crash:
blued[163:10b] Apple Bluetooth daemon started.
blued[163:10b] *** Terminating app due to uncaught exception ‘NSInvalidArgumentException’, reason: ‘***
-[NSCFDictionary setObject:forKey:]: attempt to insert nil value (key:
0782 – Machine Model)’
> can be rectified by ensuring that an ethernet adapter of some form (even a Wi-Fi one) is present.
I though so, but I have two network controller available:
* the stock Ethernet driver, with its actual MAC address
* a Dell 1505 802.11b/g/n adapter
both cards work fine
> With a stock NC10, this won’t be the case: The installer doesn’t include an ethernet driver, since there’s currently still no way to automatically determine the correct MAC address
True, but as I said in my previous post, I’ve tweaked the Yukon2 driver so that it returns the actual MAC address of the card (I’ve read the MAC address from Linux, then changed the default 00:11:22:33:44:55 hardcoded value with the actual card unique address). So, from the very first boot, the stock Ethernet port is up and running, before starting to install Leopard.
April 27th, 2009 at 6:52 pm
Stuart…Due to productivity issues, I’ve cloned my Leopard installation over to an external hard drive and have reinstalled Windows Home XP as the exclusive OS on the NC10. Due to the wireless driver issue with Leopard I have the Dell 1395 card installed. If you were going to be using XP exclusively with your NC10, which wireless card of those two would be the best to use, please?
Thanks in advance.
Larry
April 30th, 2009 at 10:42 pm
Stuart, I got the installation to work ok but I cannot get my EFI partition to mount. I am using a Samsung N110. I copy and pasted the first script in your post line by line into terminal but I still cannot see my EFI partition anywhere. Any help would be appreciated. Thanks.
May 1st, 2009 at 9:28 am
John, if the script executed successfully (which is generally the case if you don’t see anything indicating otherwise on screen) and you get the text reminding you to unmount the EFI partition once you’ve finished, the EFI partition should be availabel on /Volumes/EFI (and should also apear as an icon on the desktop). I’d advise accessing the EFI partition exclusively via Terminal.app, due to the permissions upon files within it and to reduce the chance of accidentally breaking something!.
Larry, I’m afraid that I don’t use Windows and so can’t really comment… however, I’d probably stick with the Dell card (especially if it’s already installed in the machine): The Atheros card doesn’t work (well) on any OS other than Windows, the Broadcom chip which Dell uses is widely supported and well understood. If you ever decide to use Linux or Mac OS with the machine again in the future, the Dell is the one you want.
May 1st, 2009 at 10:30 am
I’ve installed a new 2GB SO-DIMM, no problem with this new DDR2 memory.
Something I can’t explain is that now the blued daemon starts and works with no error. I don’t see the relationship between the memory size and the bluetooth daemon, anyway it works fine by now.
I have a new question related to the Touchpad: for now, it works as a basic trackpad, and there’s no setting pane available to change its sensitivity and speed. Is there some specific driver to install? I read about the voodooPS2 driver on some websites, but I wonder if this driver is required, what version should be used (in order not to trash the current installation that works fine) or if there is a better way to improve the touchpad management?
May 1st, 2009 at 10:53 am
eblot, It’s possible that you’ve got a bad DIMM there: given that the machine starts from a fixed blank state and starts the same services during the same boot sequence, it’s at least possible that it just so happens that the Bluetooth daemon happened to be loaded into a bad area of the memory on each boot…
I’ve been meaning to look at the VoodooPS2 driver for some time now – but it has had teething problems and hasn’t yet been announced as stable, so I’m waiting for now… mainly because the Trackpad doesn’t bother me too much. There is a fix that can be applied to bring back the Touchpad preference pane – but this isn’t of as much use as it sounds: The controls aren’t especially fine-grained, and the problem is that the OS X drivers assume a square trackpad: If you decrease the NC10’s trackpad sensitivity so that it is correct vertically, it will be way too slow horizontally.
Apparently the amazon.com Special Edition NC10 is one of the best solutions, as it has a larger, squarer trackpad. I believe that the NC110s do also, but since they have glossy screens I’m not interested in them.
May 1st, 2009 at 2:00 pm
Thank you again, Stuart.
May 1st, 2009 at 2:05 pm
Sorry for the double post, but interesting you commented on Linux. Just last night a friend mentioned gOS and stated it was the most mac like of the Linux distros. I’ve still got that cloned external Leopard install which boots just fine and may well attempt putting it back on the internal hard drive with a triple boot configuration with the addition of the gOS partition. It’s nice to know the Dell card would be the supported hardware. If anyone is curious about gOS here’s the link.
http://www.thinkgos.com/gos/index.html
With appreciation. Larry
May 1st, 2009 at 10:38 pm
Stuart, I’ve finally got everything I need working on my netbook (EFI wasn’t mounting until I did “killall Finder”). But, I have one problem left. I added the 4 VoodooPS2 kext files to my EFI partition and I installed the VoodooPS2 prefpane. Everything works perfectly, but I lose my VoodooPS2 prefpane settings everytime I restart my computer. Is there any way that you know of to get them to save so I don’t have to change the settings every time I restart?
May 2nd, 2009 at 10:02 am
Hi there – excellent guide. Worked first time. Thank you for your efforts.
However, I’ve perhaps rocked the boat too much and trying to dual boot the GPT partitioned drive with Windows 7. I am frustratingly close. Here’s what I did
1) I followed your guide again exactly, except I made two partions instead of one. The first was 32 Gb named ‘Windows 7′, the second took up the rest named ‘Leopard’, and both were the mac default journaled file system.
2) After installing and booting from the HD, the bootloader gave me two options. :”Windows 7″ & “Leopard”. Choosing the latter reliably booted into OS X every time. Once I was in OS X, I could see both partitions on the desktop.
3) With a working OS X install, I then rebooted with the Windows 7 RC disk in an attached USB drive.
4) The installer could see the HD and all partitions, but kept saying it could not installed on a GPT partitioned drive. It wouldn’t let me format any of the partitions either.
5) I then back to OS X, and opened disk utility. I chose to format the 32GB windows partition as FAT32.
6) I went back to the Windows 7 install, this time it gave me the option to format the 32gb partition, which I did. I then succesfully installed.
7) Now every time I booted, it went straight to Windows 7, no menu options.
So, overall, I can sort of dual boot. The default in Windows 7, and I can get into OS X if I boot from the USB thumb drive created with syslinux.
I tried running your install script again, thinking this might re-enable EFI partition as the active one. But this didn’t seem to work, and had the rather odd effect of setting my resolution in OS X as 800×600. Something I’ve not been able to fix.
I saw the link you provided regarding dual booting a GPT partition, but the solution is not really clear.
Thanks again
Marcos
May 5th, 2009 at 4:59 pm
I’m getting the same blued process crashing issue as eblot. Don’t think it’s a memory issue.
May 5th, 2009 at 6:09 pm
John, I think that’s a known problem with the current VoodooPS2 beta… that’s why I’m waiting for the full release
Marcos, It sounds like Windows overwrote the MBR boot-loader when it installed – which it always does, to be fair. Luckily, it will happily boot with the boot-loader in the header of it’s partition with a different MBR boot-loader, so feel free to install GrUB, Chameleon, or anything else which works onto the MBR, and you should be able to multi-boot any OS (… although note that I’ve not tried this myself). Chameleon does seem a good choice, though – it should auto-detect drives and do-the-right-thing(tm).
In terms of the blued problem, you’re right – if multiple people are affected (especially on hardware that works correctly under Windows) then it’s highly unlikely to be hardware-related. Having not seen the problem myself, though, it’s hard to comment. Did the problem suddenly appear at some point, or has it always happened on this install? Did it happen on any previous install? Does the state of the BT adapter (enabled or disabled) make any difference?
eblot mentioned that his started malfunctioning after the installation of a Software Update – but since there were no new ones at the time, I assume that this was just bringing that machine up to date. My machine says that it is fully updated, so there’s nothing obvious there, either.
It’s sort of a desperate suggestion, but given the lack of anything more constructive I’d suggest running a Filesystem Check and a Permissions Repair on the system drive from Disk Utility, and also to re-run ‘update.sh’ on the EFI partition. At least if this doesn’t fix things then we’ll at least know where we stand.
May 5th, 2009 at 6:53 pm
stuart, many thanks for this guide! working almost perfectly.
only small problem that the machine does not wake up after sleep. havent installed any extra extensions besides the ones that are included in your package. any ideas where to start?
havent still had the chance to try the vga. but will be happy even without mirrormode…
you mentioned that you were going to post your script for changing the brightness? is that still on? or perhaps there is a good one someone could point me to.
cheers
May 5th, 2009 at 7:44 pm
Stuart> It’s possible that you’ve got a bad DIMM there
I thought about this option at first, but I don’t think it matches the symptoms: I’ve disabled the com.apple.blued launchd script, so blued does not start up automatically at boottime [using Lingon tool]. I then tried to launch blued (sudo /usr/sbin/blued) from a Terminal, at various times after the NC10 boot up sequence (some seconds, some minutes, even hours). Many apps have been launched in the meantime, with no noticeable issues nor crashes. It is very unlikely the blued daemon got loaded at the same physical address in these conditions, but it nevertheless crashed every time. Marcos, how much memory have you mounted on your NC10?
As a side note, the Touchpad prefpane finally appeared (and is now always available). I’m not sure what triggered its appearance, but it’s one of the following actions:
* plug in or plug out the power DC while the NC10 lid is closed and in sleep mode
* plug in or plug out the stereo output jack within the same condition
(note that I had removed the “matching” XML tags as documented, and power cycled many times prior to execute these actions)
It’s is more likely that the first action triggered it, as I can’t see a relationship between the prefpane and the audio jack.
BTW, I cannot get the audio output jack to work: is there anything to change to get it working?
May 5th, 2009 at 8:02 pm
eblot I had the same problem with the Trackpad icon randomly appearing at some point – I didn’t really think much more about it!
I think we need more information to further diagnose the blued issues… which I’m still not seeing (thank goodness) on my machine.
To switch to the Headphone jack, you need CHUD from Apple’s Developer Tools/Xcode installed – this is on the installation DVD or downloadable from developer.apple.com and also the NC10-specific version of Audieee, available from my downloads page.
sakalli, you need to disable Safe Sleep – as detailed towards the end of the guide above (via a link to MacOSXHInts.com). This is currently needed even with Chameleon, because its wake-from-hibernation support is still not yet working correctly.
May 6th, 2009 at 3:32 am
that did the trick. thank you!
May 6th, 2009 at 9:55 am
eblot/stuart
Can I refer you to the BIke Town forum post on this, which I’ve just updated.
http://mysticus.titanous.com/forum/viewtopic.php?f=53&t=213&p=1277#p1277
Much as I appreciate Stuart’s blog, I think the forum is a better place for this kind of thing.
May 7th, 2009 at 12:24 am
Hi Stuart…I’m giving more thought to a dual boot configuration and want to run an idea by you. I also understand that this idea might undermine the EFI partition design you’ve created, but you’ve stated you’re willing to help, so here goes. The idea I have could be pretty clever if it works.
Let me start first with stating exactly where I am in my configuration. Presently the NC10 has a dual partitioned hard drive with a install of XP Home on the first NTFS partition. That partition is sized at 50 MB. The second partition is FAT32 and is blank and is around 100MB. The XP installs boots and works perfectly. I used Easus Partion Master 3.5 to set up the partition schemes. The NTFS partition is Primary and the FAT32 is Logical. Note that before I do any more installs this setup could be changed to add a third partition or resize the current ones.
On an external, note external, Samsung USB powered 320 GB hard drive, GUID formatted, is the clone of Leopard created using your EFI method. This install was cloned from the NC10 when I had originally installed it as a GUID single partitioned install along with your EFI modified partition. Using the BIOS setting, it can boot normally and fully functionally off of the external hard drive and operate as it would if it were an internally installed OS. In other words, I have a dual boot machine with your EFI method working, except XP and Leopard are on two separate hard drives.
The idea I have is to somehow clone that Leopard installation from the external USB hard drive on the the blank second partition on the Samsung. I’ve tried it before using the original modified 8 GB thumbdrive Leopard installer and using the USB thumb drive bootloader, I’m able to boot into your original modified Leopard installer and then use it’s Disk Utility to format that second partition on the Samsung to MacOS Extended (Journaled) After the format, I again use Disk Utility to “Restore” the installation of the external HD to the second partition on the Samsung. That restore goes without a hitch.
After the restore finished, I rebooted, and the BIOS in the Samsung sees both Leopard and XP. When I selected Leopard, it would boot, but only appearing like the install was before adding the EFI extensions. I’m assuming this type of install has negated the functionality of your EFI method, since we’re no longer GUID formatted. What I’m wondering is if there is a way to manually install the kexts I would need to bring it back up to it’s full functionality as originally working via EFI. That’s one part of the issue and here’s the next.
Let’s reboot and now select the XP install to boot up. It won’t boot normally, but hangs at the “calling chainbooter” Only a manual restart will get me out of that screen and so I’m stuck with only being able to boot the unmodified Leopard. XP is seemingly completely unavailable to boot into, but it’s there on that first partition.
I’ve figured out how to get XP booting again, but it requires reformatting that second partition using the Samsung XP install disk. I just proceed as if doing a new install of XP, select “quick” NTFS format on that second partition. Once it’s formatted, I’ll stop the install, reboot, and then XP will again boot up normally. Leopard is completely gone at this point.
I feel like I’m close to something here, but feel like I’m chasing my tail. Do you have any idea whatsoever what I could do to make this idea work better. Do I need to somehow manually create an EFI partition as a third partition?
The Leopard install I’m cloning over from the external HD is over 28GB and is working beautifully. I don’t want to reinstall from scratch unless I have to but I will if necessary.
Hopefully I’ve made this issue make sense. Would you please share any thoughts on this concept with me, please. If somehow I need to re-modify the Leopard installer, I’ve got an 8 and 16 GB USB thumb drive to also work with.
Thanks
Larry
May 7th, 2009 at 9:08 pm
Hi,
I saw that there is a successor of the Samsung NC10, the N110. It’s a tad faster but still cheap. What do you reckon? Could I buy that one and still create a nice Hackintosh out of it?
Or should I stick with the good ole NC10? Thanx for your help and your great work.
Kind regards, Yawg.
May 7th, 2009 at 11:26 pm
Yawg, so far as I’m aware the N110 is pretty much identical to the NC10, hardware-wise – which the exception of a higher-capacity battery. It’s exactly the same N270 processor at the same speed: The N110 isn’t an N280-based machine.
(The N280 is broadly identical to the N270, but runs on a faster 667MHz bus as opposed to the 533MHz bus of the former)
As I think I’ve mentioned before, having a squarer-ratio Trackpad is a bonus for tracking speeds with the standard PS2 drivers. Processor, memory, and hardware is apparently identical. I’m not really a fan of the red line around the machine – but the kicker for me is the screen: From what I hear the N110 has a glossy reflective screen. I hate these things. For that reason alone I’d personally stick with the NC10.
As always, you pays your money, you makes your choice.
May 9th, 2009 at 4:22 pm
just wondering. Is there a way to properly resize the iphone simulator so that it fits the screen and the controls aren’t off? i modified your line above in the 2nd post about the appleDisplayScaleFactor to modify the com.apple.iphonesimulator.plist and it resizes it but the control is off.
also, i ran your script to mount the efi partition but when i try to access the extensions folder on the partition, it says that i do not have sufficient access privileges. what is the problem here?
May 9th, 2009 at 8:40 pm
Hi Stuart,
Thanx for your comment. So I’ll probably stick with the NC10. But another issue: how about the quality of the DAC of the Samsung? I’m a hardcore audio nut and would like a real good audio out. Of course here would be no Digital Out on this humble netbook?
Checking out some second hand NC10s at the mo …
Cheers, Yawg.
May 11th, 2009 at 6:57 am
Hi,
>Sebastian:
Have you found a way to fix your sleep problem?
I’ve got the same issue – on the same system (UMTS enabled NC10).
My BIOS Version is 04CA, maybe the new 07CA will improve this issue?
For details see:
http://mysticus.titanous.com/forum/viewtopic.php?f=23&t=223&start=0
Thanks!
May 12th, 2009 at 9:59 pm
10.5.7 update = fail
I thought that the EFI method was meant to be better that the patched install, because one could do updates without anything breaking…
May 13th, 2009 at 7:11 am
Marcos not at all, I’m afraid: new releases will need new drivers. What the EFI method ensures is that (i) You can install from a stock retail DVD, (ii) You don’t need to make (and remember) changes to the System Partition – all changes are in one place, and (iii) You can reinstall the same version of OS X from a blank/corrupted System Partition – your modifications aren’t lost.
To the matter at hand: If your system isn’t currently bootable, then use your initial USB boot key to get it going…
10.5.7 has been a seamless upgrade – the only interesting note so far is that OS X detects the Atom as a 4.1GHz processor(!), and I’m not sure yet as to whether the machine is running slightly more slowly than previously (although it could be that OS X is rebuilding application caches). I’ve also noted that, with the same previously working AppleYukon2.kext, I’m now getting a MAC address of 00:11:22:33:44:55 again…
In any case, everything looks good so far and I’ve not found anything that’s obviously broken.
To upgrade, backup your /Volumes/EFI/Extensions or /Volumes/EFI/Extras/Extensions directory, then extract the linked archive of Extensions into it’s original place. Don’t forget to then run /Volumes/EFI/update.sh to rebuild the Extensions.mkext cache. Without rebooting, now install the 10.5.7 Combo update. Once installed, the machine (like any real Mac) will reboot twice before the desktop returns – this is normal.
The archive is at http://files.stuart.shelton.me/mac/Extensions-10.5.7.tar.bz2.
Once this is all more thoroughly tested, I’ll update the Installer… although a release version of the Voodoo Extensions wouldn’t go amiss either
May 13th, 2009 at 12:40 pm
Hi Stuart,
I hope this isn’t common knoledge yet, I’m not a geek and quite new to the Hackintosh thing:
Does the on-board WiFi-thing and Bluetooth work under Leopard? And how about the webcam? I would need those.
Perhaps for me a dual-boot option of OSX and Windoze would be better if those don’t work. With 160 gig of hard disk space that wouldn’t be a problem.
Anyway, I’d prefer a Mac-only solution as I’ve worked with Macs since 1990 and never liked the M$ approach …
TIA for your help, Jörg.
May 13th, 2009 at 8:22 pm
Stuart,
> I’ve also noted that, with the same previously working AppleYukon2.kext, I’m now getting a MAC address of 00:11:22:33:44:55 again…
Is it possible to patch it again with another MAC address, as it used to be w/ the previous driver?
> Once this is all more thoroughly tested, I’ll update the Installer…
It would be nice to upgrade the installation details as well: a single 8 GB USB key is enough (no need for an extra USB key to boot up the system)
May 14th, 2009 at 8:13 am
Yawg Bluetooth and the Webcam all work with OS X out of the box, the Ethernet adapter now works out of the box with 10.5.7 but has the wrong MAC address, and unfortunately the stock Wifi card still doesn’t work.
(It can be convinced to work – unreliably – by prodding it with certain tools, but this isn’t at all user-friendly).
eblot I’m working on the AppleYukon2 driver now – what I’d forgotten was that the driver I was using was actually from a 10.5.7 beta, and that the driver now exists as a plugin to IONetworkingFamily. Unfortunately, I haven’t found the location of the MAC address within this yet.
(Mainly due to the lack of quality hex-editing tools: I seem to remember that the default MAC address is padded with an extra digit per component, but none of the tools I have can search based on regular expressions.)
Someone did point me at the right place (or padding?) but I’ve not been able to find that post either
May 14th, 2009 at 8:24 am
Okay, for future reference the padding is ‘C6 45 E2‘ to ‘C6 45 E7‘, as detailed here.
May 14th, 2009 at 8:37 am
If AppleYukon2.kext is left as a Plugin of IONetworkingFamily.kext then the system extension is loaded in place of the EFI extension.
To prevent this, move AppleYukon2.kext to the top-level /Volumes/EFI/Extensions/ or /Volumes/EFI/Extra/Extensions/ directory, and all will be well.
May 14th, 2009 at 8:40 am
My Trackpad PreferencePane is working again too – which will either be due to having a valid UUID due to the (now correct) en0 MAC address, or because I erased ~/Library/Caches/com.apple.preferencepanes*.
That now makes 10.5.7 a complete and fully-featured upgrade!
May 15th, 2009 at 3:24 pm
Stuart,
I know I’m fairly novice in a lot of this low level hackery, so it’s no real surprise that I’m having a tough time understanding what this EFI volume stuff is about.
When you say before the 10.5.7 upgrade, I should backup the EFI volume, how/where do I do that?
When you talk about using the AppleYukon2.kext (or other ktexts), how do I handle those?
Sorry to ask for a step down to such a basic level, but I missed that somewhere along the line.
Thanks!
May 15th, 2009 at 4:01 pm
In the first comment on this post, I wrote a script to mount your EFI partition. Save this to a file (e.g. ‘mountefi.sh’) and from Terminal.app make it executable (e.g. ‘chmod 755 mountefi.sh’). So long as you have a password set on your account (which you can alter from the ‘Users’ System Preferences pane) running this script (‘~/mountefi.sh’ from Terminall.app) will mount the EFI partition on “/Volumes/EFI”. You can then move into this directory (‘cd /Volumes/EFI/’) and backup your current 10.5.6 extensions (‘cp -r Extensions Extensions.10.5.6′), after which you’re ready to install the 10.5.7 extensions.
Having said all of this, it’s very important that you understand what you are doing rather than just copying what someone else has said by rote. The AppleYukon2 driver, for example, has to be moved from the IONetworkFamily Plugins directory to the top-level Extensions directory – and then preferably hex-edited to correct the default invalid MAC address.
Please do read around and build your understanding of the topic and of the issues involved – but if you’re not confident that you understand the procedure and how to recover in case something goes wrong, then please stay on 10.5.6 until (more) user-friendly installers are made available.
It you still want to proceed, feel free to email me and I’ll try to guide you through what needs to be done.
May 15th, 2009 at 6:18 pm
Hi Stuart…feel free to remove my last query to you if you feel it’s too long winded or not appropriate. I’m still booting 10.5.6 from the external drive. Perhaps it’s impossible to do what I imagined. Thanks again for all you’ve done and hopefully soon I’ll do the upgrade to 1-.5.7
If my cloning question is possibly doable, it’s okay to email me with whatever ideas you have. Whatever works.
Larry
May 17th, 2009 at 1:55 am
Sounds like it’s probably smart to wait for the auto-upgrade
May 17th, 2009 at 10:47 pm
Hours of googling still has not lead me to a proper solution for my experiements! So I’ve used these steps here to create a two partition NC10 – one for Leopard and one for Win7/Vista. I made it GUID and installed Leopard just fine. Ran the EFI updater tool and voila it’s all fancy! Now if I try to install Chameleon, it’s all crazytime! I can’t boot into Leopard without it hanging and also can’t boot the 10.5.6 installer from Chameleon. If I use the original USB disk, I can boot into my Leopard install. I tried to erase the EFI partition and reinstall the tools on this page, but the Chameleon boot still shows up.
So questions are:
1. Say I didn’t want to lose anything, how would i remove Chameleon?
2. If I wanted to use Chameleon (I tried the latest RC), how do I get it to properly install and boot up my Leopard install? Will it mess up Vista/Win7 if I install that also?
Side question 3. I”m a little unclear on what needs to be done if updating to 10.5.7. It appears as though all these drivers need to be redone, but I thought the purpose of this type of installation in this blog entry is that it DOESN’T require all this?
May 18th, 2009 at 8:10 am
Hello,
I am a bit lost at the moment because it is impossible to reach Insanely mac forum and the dedicated mysticus NC10 furum is also broken atm.
Is there other specific nc10 forum where we could have good information ?
I have installed osx with the mysticus cd, also no effi installation.
I have updated to 10.5.7 and have the chameleon 2 rc on mbr partition.
I have diseable the hibernate fonction.
When I press FN + ESC to get the computer sleep it works but I cannot get the computer to wake up even by pressin the power button.
Please can someone help me to get this fonction working ???
Thanks in advance.
May 18th, 2009 at 8:34 am
@Chris :
Answer of your question 3 is on the Stuart post #102.
May 18th, 2009 at 9:41 am
sebastien, I’m afraid that since I don’t use a Mysticus install I can’t provide much assistance with sleep issues, but have you tried using ‘pmset‘ to set ‘hibernatemode‘ to ‘0‘, as above?
Chris, given that Chameleon is a boot-loader which is written directly to the start of the disc, there is no real “uninstall” procedure – you just replace it with something else.
(There will still be the “Extras” folder – but this is ancillary and can be replaced at will)
When Windows is installed, it will automatically write two boot-loaders: One to the MBR of the system disc, and one to the header of the partition upon which it is installed. This means that after installing Windows, you will boot directly in to Windows. However, if Chameleon is then installed to the MBR, it can still chain-load the Windows loader at the start of its partition.
Therefore, if you install Windows and then reinstall Chameleon then you should be able to boot either system at will.
(Note that you’ll need to be running Windows Vista or later for EFI/GUID/GPT support. Although not significant in this instance, Windows 7 has altered the way that the boot-loader works, so that it’s no longer easily possible to use the Windows 7 boot loader (as opposed to Chameleon) as the primary boot loader on the MBR)
May 18th, 2009 at 6:59 pm
It took me a while to process post #102 as I just had to follow along what it said then suddenly I understood more about how the EFI partition worked and the Extensions in there. There was a disconnect in my brain about how Stuart here completes this installation process. Once I understood (at about 3am last nite) I nearly peed my pants!
So is it fair to say that the Extensions here in the EFI are somewhat how MAc OS X manages fonts? There are multiple Font folders in OS X (System, Library, and User Library), and they go in order of loading them, some taking precedent over others.
This whole EFI shenanigans has specialized extensions to allow a plain retail install to work unmodified, but the EFI area is what gets changed to kind of redirect the hardware calls of the standard installation? (Hence, the need for the 10.5.7 Extension mods in the EFI partition.)
So the only hiccup I keep having is playing with the Chameleon 2.0 RC1 Installer. During install, I have the option of which drive I install it to. Originally, I was installing it to the Leopard partition and also check boxing format EFI partition and installing there. This lead to a non bootable system, even when booting from the USB stick. I tried only formatting the EFI and also NOT formatting the EFI, leaving all the Stuart made files there untouched. So even when booting from Stuarts USB bootloader, I learned that the Chameleon installer puts data on the Leopard partition. So if I boot from the USB stick, choose Leopard, then I still see the chameleon Apple wallpaper, and an incomplete boot. I’ve had several variations of this. So when I install Chameleon, isn’t there something to ONLY allow it to affect the EFI partition? And when I do this, doesn’t this erase all the Stuart made 10.5.7 Extensions? So I just have to put those 10.5.7 Extensions made by stuart and it WILL start booting again?
May 19th, 2009 at 10:20 pm
Ok ;-( So the upgrade to 10.5.7 bricked my NC10. It keeps crashing at boot (early stage) and when I try to boot from the USB key, I get the following error message:
System config file ‘/com.apple.boot.S/Library/Preferences/SystemConfiguration/com.apple.Boot.plist’ not found
Any idea about how to recover from such an error?
May 20th, 2009 at 9:53 pm
Ok, I’ve been able to recover from the crash at start up, and found the issue: as soon as the AppleYukon2 driver is modified (to support the proper MAC address), the crash occurs.
I’m sure I have not corrupted the driver itself: I’ve compared the pristine and the modified version: same size, only 6 bytes modified: the 6 bytes from the MAC address.
Stuart, are you sure there’s no other operation than removing the AppleYukon2 driver from the IONetworkingFamily.kext subdirectory to get it work?
May 21st, 2009 at 10:48 am
eblot, yes – I’m afraid that I’m absolutely sure that there’s no other operation needed other than moving the AppleYukon2.kext plugin from within IONetworkingFamily.kext to the top-level Extensions directory, and then running /Volumes/EFI/update.sh.
Note that there is a ‘001122334455‘ sequence in the AppleYukon2 binary – but this is not the part much should be changed. The actual sequence is ‘c645e200c645e211c645e222c645e233c645e244c645e255‘.
I’m still planning to build an automatic patching installer which will take all the stock extensions from the System directory, patch them, and place them in the right places – meaning that no additional data and no (Apple) kernel extensions ever need be downloaded for a full retail install. I do need a spare moment first, though
May 21st, 2009 at 11:00 am
> there’s no other operation needed other than moving the AppleYukon2.kext plugin from within IONetworkingFamily.kext to the top-level Extensions directory, and then running /Volumes/EFI/update.sh.
I tried it four times: each time, same result: crash at boot ;-( Once I’ve restored the original driver (and run update.sh), the system boots as expected.
Have you kept the original Yukon2 driver on the system disk ?
BTW, if you build an installer, the INITRD.IMG file seems to come from a Mini9 boot up system: I guess some drivers/extensions could be removed as well.
May 21st, 2009 at 11:29 am
> c645e200c645e211c645e222c645e233c645e244c645e255
Are you sure about this sequence ?
The one I found is a bit different: E2 is incremented for each position, that is
c645e200c645e311c645e422c645e533c645e644c645e755
May 21st, 2009 at 11:35 am
Chris, you’ve got the right idea there: EFI-capable boot-loaders point the OS X Mach kernel to examine the contents of the EFI partition’s Extensions.mkext cache before the System cache – and this cache contains the full path to the kernel extensions referenced within.
(This is why, generally, there’s no need to mess about bumping version numbers for EFI installs)
Therefore, any extensions on the EFI partition will be referenced, and therefore loaded, before the System ones. The System extensions will then believe that they are already loaded, and so will not interact with the system further.
Cases where this breaks down is if extensions are loaded at a later stage of the boot process, or if they are plugins of a top-level extension – which is why AppleYukon2.kext has to be relocated.
The EFI partition doesn’t have any magic – it is just an area of disk which is guaranteed to exist (on GUID/GPT discs) and that it guaranteed not to be modified or over-written. Chameleon 2 also supports an Extras folder on the system partition. Some favour this approach on the basis that they are conceptually happier with it – I’d suggest that if your system partition is damaged then it still leaves you unable to boot a fresh re-install. With an EFI partition, you re-install the same version as your were previously running, and nothing else is needed to get a fully-working system.
(I’ve also placed a feature-request with the Voodoo team who release Chameleon, asking that versioned Extensions directories be supported, so that an EFI partition could support any and all releases of OS X simultaneously! If you agree that this would be useful, please bump the post here)
I’d strongly advise not using any installer to install Chameleon (as you don’t know what assumptions the author may have made) but just download the official distribution and follow the included instructions to install by hand. It really is a very simple two-minute process.
May 21st, 2009 at 11:36 am
eblot my bad – itchy copy-and-paste finger
You’re absolutely right – the “E” numbers should increment with each digit. Sorry!
May 21st, 2009 at 11:41 am
eblot, you’re right – it was a Mini9 installer which I started working from to get the NC10 working. Although I heavily modified the installer, there was little call to modify the image at the time – it worked perfectly with the Retail DVD I have. Are the Retail DVDs updated when new OS X sub-version releases are made (e.g. will new ones now be 10.5.7) or do they stick at 10.5.0 (presumably) and then rely on Software Update to perform the upgrade?
May 21st, 2009 at 11:41 am
There are two AppleYukon2 files in your 10.5.7 package:
* Extensions/AppleYukon2.kext/Contents/MacOS/AppleYukon2 634588 bytes
* Extensions/IONetworkingFamily.kext/Contents/PlugIns/AppleYukon2.kext/Contents/MacOS/AppleYukon2 622804 bytes
The second one is the original, unmodified file from Apple (binary match w/ the original file located in /System/Library/Extensions/IONetworkingFamily.kext/Contents/PlugIns/AppleYukon2.kext/Contents/MacOS/AppleYukon2 from a Mac Nook Pro 10.5.7 installation)
I’ve edited the second one, and moved it to the location of the first one. Is this correct?
May 21st, 2009 at 11:48 am
Yes – the second AppleYukon2 extension (in this case) is never used, so leaving it in place does no harm – and ensures that the IONetworkingFamily extension is unmodified (this is useful to keep track of – and this extension is needed as a dependency for others).
The top-level extension, though, is the one references by the extensions cache and loaded on system boot – and so should be modified.
I’d suggest making the changes with ‘hexedit’ (install from macports, Gentoo portage, fink, or your own choice of secondary package-manager) – it’s incredibly old-school and basic, but it’s small and works for me.
May 22nd, 2009 at 4:23 am
You’re a lovely man mister stuart to build all this. I have a much clearer understanding now. So I’ve been able to get myself a running(ish) system now, but with still some problems.
The chameleon manual install says I should install boot1h to the disk0s2 which appears to me that it wants to be installed to the say, Leopard partition. Others online, and my assumption, is that it ought to be installed to disk0s1, the EFI partition.
Anyhow, I’ve tried variations of which partitions with Chameleon but in almost all cases after installing Chameleon, I’m left with non working drivers afterwards – video is stretched and sound doesn’t operate. I put your set of 10.5.6/10.5.7 extensions into /Volumes/EFI, Volumes/EFI/Extra and in both cases, they don’t appear to work. When using Chameleon, does it ignore the /Volumes/EFI/Extensions folder and go directly to the Extra folder? I tried modifying your update.sh script to build an Extensions.mkext file that is placed in the Volumes/EFI/Extra folder and that lead to a non booting system. I tried building an mkext in your original place, but I don’t know if Chameleon ignores it.
On top of this, Win7 breaks the bootloader and it’s a complete mess! After installing Chameleon, Windows 7 doens’t boot anymore and requires repair!
It doesn’t help that I’m reading about your Yukon issues, I haven’t even got THAT far yet
But, I’m quite happy for far I’ve gotten for having had this for half a week.
May 22nd, 2009 at 10:06 am
> do they stick at 10.5.0 (presumably) and then rely on Software Update to perform the upgrade?
The Mac Box Set I bought was shipped with a Leopard 10.5.6 release; I don’t remember which version came with my MBP Unibody, but it’s definitely > 10.5.0.
There’s no need to remove useless files – it works fine with them, but to get a smaller image file. The smaller the image, the smallest the USB stick partition needed. Now that both the installer partition and the Leopard DVD partition both stand on a single USB 8GB stick, it’s easier to perform the whole installation.
May 22nd, 2009 at 10:43 am
> I’m afraid that I’m absolutely sure that there’s no other operation needed other than moving the AppleYukon2.kext plugin from within IONetworkingFamily.kext to the top-level Extensions directory, and then running /Volumes/EFI/update.sh
Stuart, sorry again, but could you show the actual size and permisions of your AppleYukon2 file? From your archive, the top-level extension directory contains a file that seems to have been patched with a 00:13:77 OID (i.e. NOT 00:11:22). It looks like a patched file for NC10. However, it is not the same as the IONetworkingFamily.kext with contains a 00:11:22 OID.
I still cannot understand what’s going on: from your blog message, the top-level file should be the only file used to drive the Ehternet chip. However mine contains a 00:13:77 OID, but ifconfig keeps reporting 00:11:22, which means that the MAC address is ignored, or that the extension itself is not used.
May 22nd, 2009 at 11:46 am
Ok, got it!
So here is what I had to do to get it working (it slightly different from your description). I don’t know why I cannot follow the same method as yours.
1. Do not move an extension from one directory to another. Moving AppleYukon2 file from the IONetworkingFamily directory to the top-level extension directory always leads, on my NC10, to a crash at boot up w/o even editing the file.
2. IONetworkingFamily/Plugins file *is* used: I’ve edited it and the MAC address is now ok. [it even takes precedence on top-level AppleYukon2 extension: when I edit the top-level file, and keep the IONetworkingFamily/Plugins file, the MAC address of the later is used]. I removed the top-level AppleYukon2 file from the Extensions/ directory, and everything work as expected.
May 22nd, 2009 at 4:33 pm
eblot, that’s weird – I had exactly the opposite experience!
I first edited the AppleYukon2 binary within IONetworkingFamily (yes, the 00:13:77 OID is the MAC address of my machine – I meant to restore the original file but I guess I forgot), and the system booted with working ethernet but a MAC address of 00:11:22:33:44:55. I then copied the extension to the top-level directory, and everything worked, no crashes.
Answers on a postcard, please
May 22nd, 2009 at 5:00 pm
Chris, I’m afraid that I can’t help with the Windows 7 problems as I’ve not tried it on my NC10. Installing Chameleon to the MBR shouldn’t affect Windows at all, though – so unless Microsoft is being over-zealous about checking whether its own boot-loader is present, I’d expect it to just-work.
I’d favour the official Chameleon instructions over what people online are saying
What you need is:
You then need an ‘Extras’ folder in the root of the EFI partition, and your ‘Extensions’, ‘com.apple.Boot.plist’, ’smbios.plist’, and ‘DSDT.aml’ (the last two optionally) within this.
The ‘update.sh’ included with the 10.5.7 extensions already auto-detects Chameleon directory layouts, so if you’re using this then you shouldn’t need to edit anything.
(*) Since the kernel resides on disk0s2, this is really the correct location for the second-stage boot-loader. Having said this, disk0s1 is much less likely to be overwritten, and the primary boot-loader seems to search for the second-stage, and so will work with either. To be on the safe side, there’s no harm in writing the image to both partitions – but bear in mind that strange things could happen after a future update if the versions don’t match.
May 23rd, 2009 at 8:44 am
Answers to my own questions about booting Win7 + Leopard & Chameleon (in case anyone else wants to know, because I sure used this post as an immense resource (better than any other!))
Started the NC10 from scratch! So order of steps that worked for me
Phase 1
Used your USB booter to start NC10
Used 10.5.6 Retail Installer to partition as GUID with two partitions, one HFS+, one FAT32 (apparently very critical to installing Win7, possibly also Vista)
Installed Leopard
Phase 2
Now boot from Win7 USB disk
Use the repair functions and command prompt to run Diskpart and make the Fat32 partition Active
Reboot into Win7 USB Installer
Choose the FAT32 partition and format as NTFS
Install Win7 (It’ll reboot twice, but you’ll have to pull the USB Win7 installer Hard drive between each so that it can continue the install)
Unit now ONLY boots Win7
Phase 3
Booted using Stuarts USB key into Leopard
Wiped EFI partition (disk0s1) as HFS+
diskutil eraseVolume “HFS+” “EFI” /dev/disk0s1
Installed Chameleon’s boot0 to MBR
sudo fdisk -f boot0 -u -y /rdisk0
Installed boot1h to EFI partition (which is different than chamelon’s instructions)
sudo dd if=boot1h of=/dev/rdisk0s1
Copied boot to EFI partition root
sudo cp boot /
Copied Stuarts 10.5.7 Extensions and copied em to /Volumes/EFI/Extra/Extensions
Copied Stuarts com.apple.boot.plist to /Volumes/EFI/Extra (this plist with the key inside, I take it that this is necessary for the display resolution?)
Copied Stuarts DSDT.aml to /Volumes/EFI/Extra
(This is probably where I originally went wrong and was having problems with audio and video previously.)
Modified Stuarts update.sh to look at /Volumes/EFI/Extra/Extensions to create the Extensions.mkext inside of /volumes/EFI/Extra
(I had thought that the mkext file was unnecessary by the way things read from other posts, but quite needed when done properly)
Update with 10.5.7 updater
(All this chameleon install breaks Windows)
Phase 4
Set Windows partition as active
boot from Win7 USB installer and used the repair windows tool to fix startup problems. Unit now boots only to windows on its own again.
Boot using Stuarts USB key into Leopard
Make the Leopard partition the active one
Voila! Everything is fancy and chameleon allows you to choose a boot drive and all that jazz!
Now to figure out what you boys and girls are talking about with the Yukon driver! yegads!
May 24th, 2009 at 5:28 pm
Hi Chris
Thanks for that little how to. *almost* worked for me. I’ve now got the Chameleon bootloader working so that I can choose to boot Leopard or Windows 7.
However, despite following your instructions (putting all of Stuart’s stuff into the /Extra/ dir), when booting into OS X its clear that not all the extensions are being picked up.
I altered the update script with the new directory name. However, it failed because there was no /Volumes/EFI/System or /Volumes/EFI/System/Bootloader directories – so I made them
was there supposed to be something there in the first place (as in your steps you say to erase Stuart’s EFI partition setup)
Thanks
Marcos
May 24th, 2009 at 5:49 pm
Scrap that – got it working – replaced /System/Bootloader with /Extra
Although I’m not entirely sure why that works.
Nor am I sure why my CPU speed is reported as 1.6GHz again – with Stuart’s latest stuff it was reported as 4GHz!
May 24th, 2009 at 8:13 pm
I should have been a little clear – I didn’t use Stuarts paths from the EFI root. I followed Chameleons wants which is to put those files directly in the Extras folder. I also have the unit reporting 1.6GHz, but I think it’s because we don’t have an SMBios.plist file (which I believe to be the area that describes the computer’s hardware).
Okay Stuart and eblot, I feel like I’ve come so far! I’ve had this NC10 for a week and I’ve learned what an EFI partition is, how your and chameleons bootloaders work in it, and now I’ve edited my very own AppleYukon2.kext to have my very own MAC address! (jumping for joy!)
I, like eblot, found that removing AppleYukon2.kext from the /Volumes/EFI/Extensions folder and using the one inside the IONetworking plugin folder to operate properly. Also, I noticed the version numbers of Stuarts AppleYukon2.kext from the Extension root and the IONetworking to be different. I used the older one that had the proper markers as described in the insanelymac forum. I suspect the newer Yukon driver to be the one that actually detects the hardware’s ethernet ID.
So here’s my newest set of issues if you can shed any light on it.
1. What scripts/hacks do I need to be able to adjust brightness?
2. So when trying to do the audio switching by installing the Azalea audio items (first drivers, then the switching app), would it be better to put the Azalea drivers in the EFI partition or let it install into the leopard installation? I’d like to keep Leopard pretty vanilla (another term i learned in the past week and a half!).
3. Stuart, you said you got trackpad settings to operate. I fixed my Ethernet ID and I’ve never got the trackpad settings. Is this provided by the software from the chameleon folks? the voodoo software?
4. I can’t get MobileMe syncing to work! I can so far sync everything except calendars. Originally, I had problems syncing anything. I suspected this was because my Ethernet ID was the 00:11:22… and that my UID was messed up according to the MobileMe server. But after fixing it, the issue persists – calendars give an error while attempting to sync. Any ideas/solutions?
June 3rd, 2009 at 5:00 pm
are the 10.5.7 drivers published somewhere?
June 7th, 2009 at 12:54 pm
Hello,
I’m having video problems and I do not understand what I must do to make 10.5.7 work correctly on my NC10. For several months I have been running 10.5.6 without a problem. Today I made the system update to 10.5.7 and I boot to a screen with what I think is bad video due to an Extension problem. I think the Mac OS is working behind the bad video screen because the mouse pointer will move and I can see Skype running through my other computer. Skype is set to load at startup on my NC10.
I made some tests…
I can boot the NC10 in Safe Mode without a problem. About This Mac says, 10.5.7 & 4.1 GHz. System Profiler – Graphics/Display says, Intel GMA 950, Resolution 1024 x 600. My Dell TrueMobile wireless card seems fine because I can connect to the internet.
I can also boot using the MacOSUSBInstaller on a USB stick. When I do this About This Mac says, 10.5.7 & 1.6 GHz. System Profiler – Graphics/Display says, Display, No Kext Loaded, Resolution 800 x 600.
I recall that before OS X I could turn Extensions on and off in a Control Panel.
Any feedback on what I should do would be great.
Thanks, Paul (info at klarimage.com)
June 9th, 2009 at 10:42 am
Update – After trying out some DSDT fixes to make sleep work (which they didn’t
) I tried moving AppleYukon2.kext back to the Plugins directory – and it worked! Go figure – goodness only knows what I did wrong before…
I’m still planning on making an Auto-patcher which automagically creates netbook-suitable extensions from System extensions, to aid in the upgrade of machines to 10.5.7 (or, indeed, any new or recent release).
Paul, I also have my processor detected as running at 4.1GHz. I’m not sure why this is, but it appears to be a cosmetic issue only.
There are various systems which allow different kexts to be enabled or disabled – but I’d advise against using them, personally. They just add additional complexity and an additional layer of uncertainty (is a given extension really disabled or not?) to an already complex system. I’d also expect that none of these would be compatible with an EFI partition.
Are you using an EFI install? Did you install the 10.5.7 driver pack (linked to from this comment) immediately before running the 10.5.7 update (but without rebooting)? Did you use the Combo 10.5.7 updater downloaded from Apple rather than the Delta 10.5.7 updater offered by Software Update?
June 9th, 2009 at 11:44 pm
Hi Stuart,
Have you considered adding Chameleon 2.0 or Bootthink to your guide?
Would be great to have one of them to as a better bootloader.
All the best
NSCXP2005
June 14th, 2009 at 10:16 am
I’ve got it on my list of things to do to rebuild a native installer (e.g. one which includes no system binaries, and instead fetches and patches the necessary extensions from the host install) and build this to work with Chameleon.
I was sorta hoping that there’d be signs of a final Chameleon version first, though – hopefully correctly supporting Deep Sleep and SMBIOS patches.
I’ve also recently been looking at DSDT patches – but many of these, whlist appearing to work on the surface, aren’t reliable beyond testing-usage.
So the original plan was to wait for several of these technologies (and possibly even OS 10.5.8/10.6) to mature, but it does now look as if an interim release will make sense…
June 14th, 2009 at 6:33 pm
Hi Stuart,
I followed your guide to try and install OS X 10.5.6 on my NC10. I got as far as the language selection and when I submitted that I got the message “Mac OS X cannot be installed on this computer” with an OK and Restart button – clicking OK allows access to the Disk Utility but the installation process ends there.
I’ve fitted a Dell 1490 wifi card (this works fine – I tested it under XP first using Dell drivers) and I’m using a USB HDD (which has had an original 10.5.6 Leopard installation disk restored to it) rather than a DVD drive.
Any ideas? Is this process OK with a 10.5.6 installation or does it need an earlier version of Leopard?
Many thanks for putting this guide together!
Mark
June 14th, 2009 at 10:43 pm
Mark, it’s worth checking that you’re trying to install from a Retail DVD, rather than from an Installation DVD which came with an Apple computer. Whereas the Retail versions are unlocked, all Installation DVDs supplied with computers are locked to the specific model which they were supplied with – to the degree which I was unable to use the Installation DVD which came with my (slightly newer) 2GHz Mac Mini to fix my brother’s (slightly older) 2GHz Mac Mini!
Having said this, it may be possible to use an SMBIOS override (such as is supported by the Chameleon boot-loader) to fake your machine type and allow installation to continue… but I’ve never tried this, so i’s just a hunch.
I’m afraid that the permanent solution, though, is to buy a Retail DVD from Apple.
June 15th, 2009 at 6:54 am
Thanks Stuart – that’ll be it! I was using an installation DVD which came with a White MacBook we bought earlier this year for our daughter.
When I get a Retail disk from Apple presumably it’ll be the latest Leopard version or can I choose and if so would 10.5.6 be the best version to go for?
June 15th, 2009 at 8:00 am
To best honest, I don’t know – I’m sure that they update the Retail DVDs when a new version is released, but I’d imagine that they sell off any remaining existing stock first… given the ease of using Software Update, it doesn’t seem to make sense to throw out a stack of perfectly good discs.
Having said that, I think that there’s some recent hardware (latest iMacs?) which requires 10.5.7 to run – so for this reason, you’ll probably not find anything earlier.
June 15th, 2009 at 10:19 am
Hi Stuart,
Would you be able to give us a time frame for when you will be releasing your native installer for Retail Installs?
Thank you for your time
All the best
NSCXP2005
June 16th, 2009 at 7:41 pm
Hi Stuart,
I have something strange happening. I’ve installed 10.5.6 following your method without a hitch. Then I unfortunately upgraded to 10.5.7 and of course the all thing went south …. Now, I’m trying to reinstall the all thing from the beginning, but after the initial DVD install, when I reboot and go to the Mac installer DMG inside the key, when I try to executhe the installer script, it refuses and tells me that the Classic environment is no longer supported …… that script worked fine the first time and I haven’t changed anything inside the usb key since …
Any idea ?
Thanks,
mike
June 19th, 2009 at 5:27 pm
Hi,
I finally got my NC10 today. I”m looking for a cheap Mac-compatible WiFi-adapter now. Is there a list of Leopard-compatible WiFi-adaptersavailable now?
Regards, Jörg.
June 19th, 2009 at 11:15 pm
Stuart: Many thanks for this guide! I’m just about to install OS X retail DVD on my NC10 and I was wondering can I just download the 10.5.7 combo update and use your Extensions from here: http://files.stuart.shelton.me/mac/Extensions-10.5.7.tar.bz2
?? Does it not matter if I go straight from Leopard retail DVD to 10.5.7?
June 20th, 2009 at 8:09 am
Hi Stuart,
Up and running now in 10.5.6 now – many thanks for your help and this guide!
Just a couple of issues:
- can I fix the keyboard layout (e.g. shift-2 gives @ instead of “) – I think I select British during the install?
- how do I enable touch-clicking on the trackpad, I don’t have a mouse tab in the sys prefs keyboard & mouse app when no external mouse is plugged in
Is anyone one working on a way to get the brightness keys working?
Thanks, Mark
June 20th, 2009 at 8:40 pm
Mark W:
In the same spot. Actually, I upgraded to 10.5.7 seamlessly using Stuart’s 10.5.7 /Volumes/EFI/Extensions
I tried the Trackpad plist fix above, and perhaps I wasn’t patient enough, but it still didn’t appear. There do seem to be a bunch of Synaptics touchpad drivers out there, but the one I tried is less accurate than the default one.
I want to thank Stuart for all his work and taking the time to make this so easy for the punter.
I might give the Mysticus install method a try just because of the brightness issue– surprised how much I want to have working brightness keys.
D
June 23rd, 2009 at 5:05 am
Hey Stuart, any luck with 10.5.7? I’d love to upgrade, of course
June 23rd, 2009 at 10:22 pm
Hi Stuart many thanks for your guide – worked fantastically and always feels better having retail install vs other “hacked” versions!
I have 10.5.6 installed (because you included the extensions in your install process)
Not too sure on how to update to 10.5.7 perhaps you (or someone else here in the know) could post a short walk through including any terminal commands needed etc?
Many thanks!
Matt
June 24th, 2009 at 8:08 am
Hey guys also wondering has anyone figured out how to fix the vertical sensitivity of the NC10’s trackpad??
Not a problem if i’m using USB Mouse but if i’m usng my NC10 out of the house its horrible…
There must be some way to fix this?
June 24th, 2009 at 8:12 am
This guy made a vertical scrolling fix for his Netbook under Ubuntu
“I’ve compiled a hacked version of the X11 Synaptics driver that includes a fudge factor for the Y component. It does hw.y *= 0.6 internally, and this pretty much compensates for the incorrect coordinates.”
His page is here: http://slacy.com/blog/2008/12/vertical-scrolling-fix-for-lenovo-s10-ubuntu/
Surely this could be done in OS X? I’m just clueless when it comes to these things
June 24th, 2009 at 8:25 am
Has anyone tried the VoodooPS2Controller.kext to fix mouse sensitivity issues?
June 24th, 2009 at 7:53 pm
Well this seems a bit dead… Is there a better way of installing OS X than this?
Anyway I have installed the Dell 9 Mini Touchpad.kext and it seems to have fixed the vertical scrolling sensitivity.
Also two finger scrolling .. Sweet!
June 25th, 2009 at 9:51 am
Hi guys,
I’ve been away for a while, so no updates recently. Right – where were we?
Mike, I’ve not heard of this happening before, but it sounds weird. All I can imagine is that some form of corruption (or unclean mounting?) has altered the data in such a way that OS X thinks that it is an old Classic binary… or possibly that it simply can’t recognise it, and so defaults to this assumption. In any case, I’d suggest re-downloading the installer image and re-creating the boot USB key. If possible, try a different device in case the one you’ve tried up until now is somehow faulty…
Jörg, You could try here, but as-yet there’s no break-down into wireless or wired adapters. Your best bet is just to look for what other people are succeeding with. The Dell TrueMobile cards are often favoured as they are cheap and well-supported.
Matt, Yup – spot on. Those are the updates to use (after the initial install has been completed – these build on top of the extensions installed by the original Installer: they likely won’t work alone).
Mark, There are various British keymaps available which try to put the keys in the right place. The one I use leaves the bottom-left slash/pipe key unused and moves this function to the top-left key – but except for this is perfect. I think I use the keymap from here, but this site may also be useful.
I still change brightness via script from Terminal.app, because I find it the fastest method – although there are many instructions around on how to set up Quicksilver and an AppleScript program to do the same thing triggered by only a keypress – but unfortunately launching the AppleScript interpretor takes several seconds for each press. For either of these solutions, you’ll need Apple’s CHUD tools (from the Developer Tools package on the Leopard installation DVD) installed.
Just recently there are also ACPI DSDT patches which claim to make the NC10 hardware appear more like a real Mac to the OS – but I’ve encountered stability problems with each of these that I’ve tried. I have heard reports of success, though – so whether this is me doing something differently, subtle hardware variations, or insufficient testing upon the part of the reporter I don’t know…
The Trackpad preference pane is a pain – even with the fix to make it appear, it can take some prodding before it comes back. The trick seems to be to edit a plist in the Keyboard pane (IIRC) and then, as noted here erase the Preference Pane cache. I’ll check what the exact change to the plist was and post it here shortly.
Jake and Matt, this should be fine! Please try the driver update package from here.
Matt, I’ve only tried the VoodooPS2 replacement driver to fix the Trackpad vertical sensitivity, and I didn’t have much luck with it. Although it worked to begin with, I had too many instances of finding that the keyboard or trackpad dropped out on me. As with the other Voodoo drivers I think they’re doing a great job and really helping fix some tough problems – but at the same time, I think that the beta release tags are very much justified: these drivers aren’t yet ready for mainstream use.
If the source for the current PS2 driver were available (which it may be…) then a similar scaling factor could be applied.
Could you please post a link to the Touchpad driver which works for you – if this is stable then I’m sure that lots of people would really appreciate it!
June 26th, 2009 at 9:33 am
Right – Trackpad PreferencePane fix:
Apply the following diff (either manually with with ‘patch -p0‘), and then execute rm ~/Library/Caches/com.apple.preferencepanes* before re-launching System Preferences. The Trackpad preference pane should then appear, giving the option to enable or disable tapping.
June 29th, 2009 at 10:34 am
Finally pulled my finger out and actually working on an iPhone app. Woudl like to (occasionally) run the iphone simulator on my netbook, but can’t find anything about scaling it.
The results in google for: AppleDisplayScaleFactor “iphone simulator”
are very limited, and one of the posts says it doesn’t really work properly scaled.
Have you had any success with this?
Thanks
Marcos
June 30th, 2009 at 8:18 am
Marcos, I use my NC10 for iPhone development myself – and I’ve not had to apply a scale factor to the simulator. Admittedly it doesn’t fit on the screen entirely – but you can easily fit the display at the top and the home button at the bottom, cutting off only the empty frame.
What sort of application are you working on?
July 1st, 2009 at 6:21 pm
Hey Stuart,
I’ve tried searching the comments for someone with a similar problem, but I haven’t found anything. So if this has been asked/answered already, apologies in advance.
I’m performing the operation for a friend who’s a Machead, but I have exactly zero experience with installing OS X. I am however an experienced tinkerer, so I’d expected I’d at least be able to get something working. I have a Windows Vista PC with MacDrive, that can read, partition, and format Mac drives, and read Mac CD/DVD media. The problem seems to lie in ambiguity:
You mention simply putting the OS X Install DVD image on a USB drive and booting from it. Now I have two things: an OS X Install DVD, and a .dmg image of that DVD. Things I’ve tried:
Connecting a slimline external DVD drive to the NC10:
– USB stick boot with Chameleon gives me an error about boot.plist which only appears for a split second, and then gives me the option to boot from hd1,1, hd1,2, and hd1,3, the first one gives me “Windows is loading files” (and hangs), the second gives me the preinstalled XP, and the third one gives me nothing (logically, cause it’s not a bootable partition).
Connecting a different external DVD drive:
- Same thing. (I was just making sure it wasn’t due to the DVD drive not being supported by Chameleon or something)
Okay. So the physical install DVD isn’t working. This was my best bet, as I’m certain this is at least on Macs, supposed to be bootable. The vague instruction about putting the install image on a USB drive leaves me puzzled.
Do I–
Format the USB drive with an Apple partition map, make a suitably-sized partition for the OS X install image, and write the contents of the .dmg to it in raw mode (using dd):
- Chameleon tells me to “press enter to install OS X”. I do so, and am greeted with a prompt asking me to boot from 80 or 81. Selecting 80 returns me to the previous prompt asking me to press enter, and selecting 81 loads syslinux again, which loads Chameleon, which asks me to press enter. I could do this all day.
Do the same thing, but with an EFI/GUID partition map:
- Same problem as above.
Do the same thing, but with an MBR partition table:
- Same problem as with the DVD drives.
Okay, so that’s not it. I go into MacDrive and format the USB drive using an Apple partition map, and make a suitably-sized HFS+ partition. I copy the .dmg file onto it, for just in case Chameleon has some clever logic to boot from an image file residing inside a filesystem (I didn’t know what else to try at this point). I get the same looping problem, but this time with another error about boot.plist in between. I actually get time to read it, and it seems the file is missing.
It’s obvious I’m doing something wrong here, but the instructions aren’t detailed enough to push me in the right direction. Do I actually need a Mac running OS X to copy the image file and make it bootable? Or is there a way to get one of those external DVD drives working? I’m kind of at a loss what to do here.
Thanks,
Muf
July 2nd, 2009 at 5:27 am
Stuart, I unzipped (bz2ed??) the 10.5.7 package but the resulting directory was locked and empty. Any chance of posting a .zip file? I seem to recall this was an issue before with the .bz2 file.
FYI – I’m reading and learning, but this stuff is tough if you’re not a guru, so thanks for you patience as I follow along!
July 2nd, 2009 at 6:32 am
OK, hacked through it. Lots of permissions problems that I think I’ve fixed and now am running 10.5.7!
w00t!
July 2nd, 2009 at 10:33 am
Hi Muf,
Your problem relating to the following:
1. You have to format your USB stick to HFS+ Mac OS Journaled
2. You have to use diskutility or dd to restore the disc or DMG file to the USB Stick
3. When you get the boot prompt asking you to boot 80 or 81, type 9F for DVD or I think maybe 82 or USB Stick.
If this doesn’t help, let me know and I will think of another way.
All the best
NSCXP2005
July 3rd, 2009 at 2:54 am
I’m trying to dualboot XP and MacOS, using the Darwin bootloader. I installed OS X first, then XP.
When I set XP to be the only active partition:
sudo fdisk -e /dev/disk0
p, f 3, w, y, exit
Windows loads fine. After that I use the generic.ISO disc and boot back into Mac OS, copy Chamelion EFI to my desktop and do:
cd ~/Desktop/Chameleon\ EFI/source/
sudo fdisk -f boot0 -u -y /dev/rdisk0
sudo dd if=boot1h of=/dev/rdisk0s2
sudo cp boot /
sudo fdisk -e /dev/disk0
p, f 2, w, y, exit
I can now select between XP and MacOS. MacOS loads fine. XP looks like it loads fine, black-background Windows logo loads up, progress bar moves. Once it boots into the GUI, it just stalls. The background is blue and I have a Windows logo where the login box should be. Running the first set of commands setting Windows to be active without dual boot selection makes Windows work. I can’t figure out what I’m doing wrong. Can someone help me?
July 3rd, 2009 at 8:28 am
Inspiring tutorial! Do you think this would work on the new Samsung N310?
July 4th, 2009 at 11:13 am
espy, I’m pretty sure that the “Active/Bootable Partition” is a boot-loader level concept, rather than anything fundamental. I know that the GRUB documentation states that Windows will fail to load if the partition it is installed upon isn’t active (I believe it uses the active partition to find its System directory), and I’m pretty sure that Linux can operate perfectly happily without an active partition being flagged. It should be perfectly possible to have Chameleon installed as the MBR boot-loader with the Windows partition still marked as being active/bootable – so perform your second set of instructions without the final ‘fdisk‘ invocation (assuming that Apple’s fdisk doesn’t re-write a legacy MBR boot-loader when it rewrites the partition tables… in which case you’ll also need to re-write your boot0).
Karl, the N310 appears to be (yet another) redesign of the NC10 chassis with very similar or even identical internal hardware – so installing MacOS onto a N310 should just work!
(… with the caveat that the Samsung WiFi adapter doesn’t work properly with OS X, so the N310’s WiFi Mini-PCIe adapter should still be replaced with a Dell equivalent, or similar. This does involve opening the machine’s case, but is not especially difficult…)
July 8th, 2009 at 10:26 pm
Hi,
thanks for the guide in the first place. I followed your instructions only partly because I wanted to keep my existing OSX. I then used NSCXP2005 posts to get boot running.
The only thing that I’ve been unable to solve (yet) is the sleep problem. Thinking that the DSDT file was not properly read from the root folder (/DSDT.aml) I took the time to create an EFI boot partition, but I created it at the end of the disk (/dev/disk0s4). Problem is sleep is still not working when the computer is connected to the power.
Two questions:
does the EFI boot partition need to be located in /dev/disk0s1 or is this not mandatory?
Is the PowerManagement.Bundle file required for it to work?
Thanks!
July 9th, 2009 at 4:08 pm
I’ve noticed that with 10.5.7 one of my external monitors that didn’t connect properly before are now… but the problem is external monitors still don’t work.
With monitor A, connecting shows an unusable lined image duplicated on both the NC10 screen and the external monitor.
With monitor B, connecting refreshes the NC10 screen to blue, like normal. Then the NC10 screen refreshes and shows the desktop like normal. But while the Sys Pref for displays shows that there are two monitors, the second monitor doesn’t actually fire up and show an image.
Anyone figured out how to make external monitors work?
July 13th, 2009 at 11:40 pm
Jose, I’m not sure that the sleep problem has been properly solved – although I’ve read of DSDT changes which allow sleep to work when on power (which does make a certain sense, since it is some USB conflict preventing sleep from working), I’ve not had any success with these. This may be me doing something wrong or the hardware I’m on, but it shouldn’t be affected by the installation method…
The EFI specification states that the EFI partition should be located at the start of the disc, and should be first in any legacy MBR partition table which may be present. Having said this, there’s nothing magic about the EFI partition – except that adherence to the EFI specification pretty much guarantee that it will never be altered in any way. You are free, however, to use whatever partition layout you’d prefer, and the installation method should still work regardless. You may have to be more careful that the partition isn’t accessed or overwritten, though. It’s worth noting that the EFI partition is almost totally hidden in the OS, whereas any standard partition will appear on your desktop by default and be accessible by programs.
So far as I’m aware, Powermanagement.bundle is unnecessary: I don’t use it on my system and, except for the sleep issue, it has no problems.
Jake, there have been reports of DSDT changes which allow external monitors to work, but again I’ve had little success myself. I’ve seen several fixes referenced which attempt to integrate DSDT tables from real Macs with those of the NC10 – but there seems to be a relative lack of understanding of what these changes actually do, and many seem to introduce unfortunate side-effects. DSDT changes will likely be the only way to solve this problem, if possible – but I can’t help feeling that there’s still some way to go…
July 17th, 2009 at 4:37 pm
I’ve now (finally!) written up a 10.5.7 upgrade guide, as several people have asked me about it by email.
(Just about in time for 10.5.8, you may well point out…)
The 10.5.7 mini-guide is here.
July 23rd, 2009 at 1:01 pm
It seems that since 10.5.7, external display does not work anymore.
I’m experiencing the same issue as Jake described; it does not seem to be related to the monitor resolution: I’ve tried with both 800×600 videoprojector and a 1280×1024 LCD screen, same results.
The mouse cursor appears ok, but the same horizontal pixels are replicated into every line.
Did anyone manage to get the VGA port to work w/ 10.5.7 ?
July 23rd, 2009 at 3:13 pm
eblot, the external display has always worked, so long as he display isn’t mirrored!
The old 10.5.4-era drivers did I believe support mirroring too, but certainly since 10.5.6 mirrored mode hasn’t worked, and using the old drivers leave artefacts around the screen.
If you have enabled mirror mode and wish to turn it off, the the easiest (and this is a relative term, you’ll note) way to disable it that I found is to enable full keyboard access and Voice Over. Open the Displays Preference Pane and ensure that the search box at the top-right is selected. Now plug in your VGA cable, which will cause the screen to corrupt, but also cause an additional tab to open in the Displays window (which Voice Over will announce), with the option to disable mirroring.
Press the Tab key until Voice Over tells you that you’re on “Tab Bar, Item 2 of 3: Arrangement” (or similar) and then press down, space, or tab (I forget which, I’m afraid) to enter this view. Keep pressing Tab until you’ve told that you’re on “Mirror displays: Check box“, and then press space to disable. You may want to play with this keyboard/Voice Over navigation within the Displays window before connecting the cable, just to get the hang of it.
All going well, you’ll now be able to use non-mirrored displays with no corruption at all.
Work is ongoing to fix this – it’s entirely possible that with 10.5.8 or with a DSDT update, display mirroring will also work.
Hope this helps,
Stuart
July 27th, 2009 at 10:20 am
> eblot, the external display has always worked, so long as he display isn’t mirrored!
Weird: it does not work *at all* on my machine w/ 10.5.7, whereas it used to work on 10.5.6. I’m not speaking about mirroring mode: in mirroring mode, screen is corrupted, and not usuable. Fortunately, my NC10 is not stuck in mirroring mode.
However, in non-mirrored mode, the NC10 does not seem to output any signal at all: external monitor falls back to sleep, and does not seem to received any image. The NC10 nevertheless detects the external monitor, as it appears in the Arrangement tab. No image is output though ;-(
July 27th, 2009 at 10:41 am
Nevermind, selection “Gather Displays” just made it: the monitor woke up and now everything is working as expecting. Thanks for your help.
July 27th, 2009 at 9:12 pm
Stuart,
Will you be considering putting Chameleon 2.0 RC2 on your setup?
Also will I be able to install W7 with your setup?
Thanks for the guide and the update guide.
NSCXP2005
July 27th, 2009 at 10:58 pm
Chameleon 2RC2 is out?!
<runs away to install>
(I’ve not tried Windows 7 myself due to the limited space on a 30Gb SSD – but since it, like Vista, can read GUI partition tables, there should be no problem running Windows 7 and Mac OS on the same machine. Bear in mind that Windows 7 will overwrite the boot-loader on installation, though – so you’ll need to reinstall Chameleon (or your preferred loader) after Windows is installed)
July 28th, 2009 at 8:11 am
Just a quick note to say that, if you’re already using Chameleon 2.0 RC1, then all you need to do to upgrade is to replace /Volumes/EFI/boot with the ‘boot’ file from the new 2.0 RC2, and write the new boot0 to your boot-sector – simple!
There’s also a new Theme named Bullet, but the only other changes are in the included convenience kernel extensions (which you shouldn’t be needing on an NC10).
July 28th, 2009 at 9:42 am
Hi Stuart,
Would you be able to post how to update chameleon on you install setup
Cheers
NSCXP2005
July 28th, 2009 at 9:48 am
Do I need to install boot1h file aswell?
Just noticed it in the Chameleon package.
All the best
NSCXP2005
July 28th, 2009 at 3:21 pm
The boot1h file is unchanged between versions. There are also a couple of new boot1 files, although as of last night no-one knew what these are for. I’m assuming that the boot0f32 is a FAT32-capable version of boot0 (although this is supposition on my part). This could be useful as it may allow EFI installs without the requirement of breaking the EFI specs and reformatting the EFI partition as HFS+ (rather than the FAT-derivative used by default).
Just a quick reminder, also: don’t use the Chameleon installer package – this doesn’t understand EFI installs, and will likely break things!
I’ll write a migration guide to move to Chameleon soon – it’s next on my list
July 28th, 2009 at 9:27 pm
Cheers Stuart, look forward to the migration guide.
All the best
NSCXP2005
August 3rd, 2009 at 9:52 am
Hi,
Does the internal mic work out of the box with this method?
Cheers
August 3rd, 2009 at 3:01 pm
No, the supplied AppleAzaliaAudio driver doesn’t enable the Internal Microphone. The VoodooHDA driver does support it, but has other problems (including the maximum volume level and static after resuming from sleep). There are reports of DSDT hacks being able to fix the on-board sound (with the stock AppleHDA driver?) but I’ve not been able to get this working myself – it may be that a hacked AppleHDA is also required.
August 13th, 2009 at 8:42 am
Quick note: OS X 10.5.8 seems to work Ok (I haven’t check audio & external display though), as well as the latest security update. I haven’t updated the EFI partition since 10.5.7
August 16th, 2009 at 5:08 pm
Stuart, et. al. – have you found any way to make YouTube and/or Quicktime videos play without massive lag?
August 26th, 2009 at 1:33 pm
What’s the latest on Snow Leopard on NC10? Is it going to work? I’ve heard of people using it ok on Dell Mini 9, which is also the 32bit atom I believe?
August 30th, 2009 at 5:35 pm
Stuart, do you think that you have had issues with DSDT because you are using ones compiled by other (see link below)?
http://www.infinitemac.com/f84/beware-using-other-peoples-dsdt-t3531/
This also might mean that it is a bad diea sharing the compiled one in your guide.
August 31st, 2009 at 7:43 pm
Jake, I’m afraid that I’ve still not seen this problem, either via Wifi or when connected by ethernet. Having said this, if you have certain kernel extensions loaded, or if you are using SMBIOS overrides with certain boot-loaders, then the Atom can be clocked-down to it’s lowest speed (800MHz) – which would undoubtedly affect YouTube playback performance. Try looking for an application and kernel-extension combo called ‘CPUi’ to see what speed your processor is running at.
Marcos, I’ll be off on holiday now – but wen I get back I’ll be giving 10.6 a try on the NC10. The main problem right now seems to be that anyone who has upgraded to a BIOS more recent than 04CA will need to downgrade – and this is non-trivial. Apparently beyond this only a couple of kernel extenions are needed – but I don’t know what hardware is enabled in this situation. I’ll keep you posted
f00b4r – though it seems to come as a surprise to many, I’m well aware of this! I’ve compared DSDT dumps from various machines with differing memory amounts, internal hardware specs, and BIOS options. Of these, the latter seems to make the biggest difference if any of the hidden Intel options are chosen. If these aren’t touched, then only two different versions are needed – one for models with internal 3G, and one without. Having said this, my next version (hopefully for 10.6 – this is what I’ve been waiting on) will re-generate a DSDT.aml customised to the machine being installed upon to negate any related problems.
September 5th, 2009 at 3:25 pm
Great stuff, let me know if you want any beta testers.
September 12th, 2009 at 4:23 pm
Hi, I am trying to install Mac OS 10.5.6 on Samsung N120. The configuration of this machine are almost identical to NC10. Do you have any idea if the above procedure will work?
I also have difficulties finding the Mac OS X compatible wireless adaptor. The wireless network card for N120 is
Realtek RTL8192E Wireless LAN 802.11n PCI-E NIC.
I am not sure if this is mac compatible. I saw your comment above saying that there is a method (using the driver in 10.5.7) of getting over this. If I have to, I’ll go for that.
FYI, the detailed configuration of N120 is as follows:
Operating System Genuine Windows XP Home SP3
CPU Intel® Atom™ Processor N270 (1.6 GHz)
System Memory 2 GB DDR2
Graphic Memory 128 MB shared
Graphic Processor Intel 945GSE
Storage 160 GB, 2.5″, 5400 RPM
Wired Ethernet LAN Marvell Yukon 88E8040 PCI-E 10 / 100 BaseTX
Wireless LAN Realtek RTL8192E Wireless LAN 802.11n PCI-E NIC
Bluetooth Bluetooth 2.0 + EDR
USB 2.0 3 USB (2 chargable USB ports)
Thanks a lot in advance for your advises.
September 12th, 2009 at 4:41 pm
Hi Stuart, one more question.
I tried the very first step, and I have had a problem.
I pasted all stuff from the MacOSUSBInstaller package into a USB drive.
Ran the command
F:\syslinux -ma F:
According to what you wrote in the guide, “this command shouldn’t produce any output”. But in my case, a DOS command window appeared and disappeared, and one of the files (ldlinux.sys) in the USB drive disappeared. Is that a sign of things going wrong?
Thanks a lot.
September 14th, 2009 at 1:47 pm
Hwarang, my bad
What I should have said is “Open a command-shell (click the Start menu, select Run if running Windows XP or remain in the quick-search text-box in Vista or Windows 7, then type “CMD.exe“) and then enter:
U:\syslinux -ma U:
… to make the drive (U: in this example) bootable.
Note that this command shouldn’t produce any output: if anything further appears inside the command-shell window before the prompt returns, then the process has failed.“
September 15th, 2009 at 11:41 am
Hi Stuart,
Are you still considering making a guide for Snow Leopard?
If you are, would you be able to give us a time frame.
Thank you for your time
All the best
NSCXP2005
September 15th, 2009 at 3:30 pm
I’ve just got back from holiday, so I’m still catching up right now – has a viable Snow Leopard installation yet been found where everything works? Last I saw was “Everything works! Except sleep and resume. And sound. And it needs a BIOS downgrade”
Having said this, I think I read yesterday that netkas has a fix for the AHCI issue, meaning that the most recent BIOS should be able to be used.
And, of course, given the cheap price of Snow Leopard, there should be much less of a barrier to everyone having physical media to perform a Retail Install from.
I’m planning on seeing what major problems exist and when most are resolved, then testing a fresh 10.6 install to determine the minimal set of changes needed and to check stability. At this point, I’ll beuild a new (Chameleon 2-based) installer and write-up the process. As mentioned, I’m a bit out of the loop right now, so many issues may already be fixed.
As such, not definite time-frame, other than “sooner rather than later, hopefully”
September 15th, 2009 at 7:56 pm
Stuart, thanks for all your help on this. I have upgraded Wifi installed, the Leopard disc, and made the bootable USB no problem. Now I’m having trouble right out of the gates trying to install Leopard.
When the first boot is attempting, screen shows ‘Loading /initrd.img…………………….’ and it’s reading the usb with the boot files
Then there is a very fast error screen saying that it can’t find a .Boot.plist file. Hacking through your boot download file, I see this file is buried in the OS Installer .img file contained within, which I believe is for later with the EFI partition (?).
So I would have to think that my usb boot is borked, or that the Leopard image on my hard USB disk is not being recognized? Saw this same error here in this thread, but that was regarding an upgrade scenario and not sure if it was answered anyway. Hopefully you can help me get past this. Thanks again.
September 15th, 2009 at 8:10 pm
Apologies, the error was actually here
September 16th, 2009 at 4:54 am
Thanks to all for this resource – it is the best I’ve seen on the subject.
I am struggling with a problem early in the installation order. I am able to see my Leopard install media in the text menu selection which comes up when I boot from the 45MB USB image.
Unfortunately, when trying to boot the USB HDD, the NC10 reboots after just a few seconds. When I try booting with “-v” for verbose options, I notice quite a bit of text mode scroll, then a change to what looks like a graphics mode followed by more boot scroll – then right after “Apple Decrypt: Starting…” it reboots. Any ideas? Did I prepare my installation media incorrectly?
September 16th, 2009 at 5:15 am
Sorry for cluttering up the page with the previous post, i simply misread the guide and had EDB disabled instead of enabled. Now, instead of rebooting, the external drive spins down and the apple logo hangs indefinitely. I’m not sure if this is an improvement!
September 16th, 2009 at 12:49 pm
Hi Stuart,
Greetings.
I got Mac OS X 10.5.7 working on my N120.
Thanks.
September 16th, 2009 at 10:35 pm
Hwarang, great news!
joe I’ve seen OS X stop at the Apple logo (with spinner) for longer than 10 minutes when performing a disk-check. Do you just have the logo, or the spinner too? Have you tried simply turning it off and trying again? My laptop occasionally stops at the Apple logo on boot, but a reboot has always cleared this. Plus, I only tend to reboot if I’ve let the batteries run out!
If you can’t get past the logo, then the best solution is again to boot with the “-v” option in order to see what’s actually happening.
September 21st, 2009 at 6:33 pm
stuart, thanks! a little persistence and fooling around was all that was needed. I’m writing this comment now from my samsung nc10 running os x.
Is it advisable to apply the 10.5.8 combo update?
Also, any suggested USB ethernet adaptors which are known to be good under OS X?
September 23rd, 2009 at 9:40 am
Hi Stuart,
Thanks for all your help with this guide. However. I took the plunge and did a clean install of snow leopard on my N110. All works fine except, Wifi (new Dell 1490 card on its way), brightness, sleep, Mic.
Do you know how I can change the bootloader? I want to try reinstalling either XP or Ubuntu to a second partition. Any help on this would be very much appreciated. Cheers.
September 24th, 2009 at 1:58 am
I did a little experimenting on my own with 10.5.8 – definitely a no-go. During the installation of the combo update, there was some potential good news: OS X reported a new ethernet interface available for configuration. However, after completing the installation and rebooting, the video is garbled starting at the login prompt. Pressing the power button once brought up another garbled window (presumably cancel, reboot, halt popup) so I assume this is “just” a video issue. I have no strategy to proceed from here, so if anyone works something out, please let us all know.
September 25th, 2009 at 6:32 am
joe, sorry for the slow response. My Samsung is running 10.5.8 acceptably – the main issue being the broken battery status information.
The best solution to upgrade a Hackintosh, as ever, is to have an actual Apple computer to hand (or a friend from whom you can borrow one
). Install the combo-update on the actual Mac, patch the kernel extensions, and then install these on the non-Apple machine before applying the combo-update to it.
And alternative method which is just as affective but requires only one machine is to launch multiple tabs in Safari (because I forget whether you’re prompted to reboot after the update is applied) and then install the combo-update. When the update has finished installing do not allow the machine to reboot. Safari comes in useful here, as it will ask you whether you want to close all tabs, and will cause the reboot to time-out if you don’t respond. Not patch the kernel extensions, and manually reboot with the 10.5.8 extensions already in place.
With the correct patches, 10.5.8 is certainly usable – but it doesn’t feel as well-integrated as previous releases: More things don’t quite work.
October 7th, 2009 at 3:07 pm
Hi!
Just wanted to say I love my NC10 with OS X! I have discovered a nice little programs called shades that installs into system preferences that basically allows you to adjust display brightness with hotkeys or in system preferences. The display thing has been bugging me a lot but this works perfectly!
http://www.charcoaldesign.co.uk/shades
October 7th, 2009 at 3:13 pm
I have also been having problems with my screen randomly turning completely bright white, but changing back to normal when it is moved slightly. I think that maybe I shifted the ribbon when installing my dell wireless card (which works perfectly). Has anyone else encountered this problem? I have done some research and it seems to be quite common, not necessarily requiring the case to be opened.
Also, should most external mics work when plugged in? Assuming they are OS X compatible?
Thanks again Stuart!
October 9th, 2009 at 4:35 pm
Kails, if Shades is easier on your eyes then that’s great – but please realise that if anything it will actually reduce your battery life when used to dim your screen!
This is because the screen itself still runs at full brightness, but Shades overlays a grey transparent layer in software to reduce the apparent brightness – the backlight isn’t being altered at all.
There are apparently now DSDT updates which, when used with certain input drivers, will allow full control of the backlight with Fn+F11 and Fn+F12 – but I’ve not managed to get these to work (probably because I’m not using the same input driver – the one which is supposed to work also had a habit of becoming unresponsive and needing a reboot to fix when I last tried it. This may well now itself be fixed).
Hmm – I’ve never heard of a screen changing like that, but wouldn’t a lose cable be more likely to make it go black rather than white? It always pays to be careful in the innards of machines, though
) I’d re-open the case and make sure that nothing got trapped or caught…
As I understand it, USB microphones should just-work(tm), but I don’t have one to test with
October 12th, 2009 at 9:26 pm
Hi Stuart,
have my netbook (NC10) up running since yesterday on OSX thanks to your great guide. Can confirm that a USB microphone works fine. I’ve used a Plantronics USB headset on Skype without any problems.
Thanks for everything
October 15th, 2009 at 10:44 am
Any news on installing from a retail snow leopard dvd? Can I just follow the same steps here? What does / doesn’t work?
October 28th, 2009 at 8:41 am
Hi Stuart:
Thanks for this wonderful guide. I followed it (and some MSI Wind guides) to install Snow Leopard onto an N310 (EFI booting). Most things are working fine (or the compromises are expected). However, one irritating problem is that the bios changes (screen brightness; Enable EDB) are always reset after shutdown or sleep so that I have to change them every time I start. This is especially a problem because I am configuring this for use for someone else (who is not the sort to remember to keep resetting bios every time she logs in).
Any suggestions would be helpful.
EW
October 29th, 2009 at 4:41 am
Update.
I followed this guide : http://www.projectosx.com/forum/index.php?showtopic=515 and made a dsdt.aml for my N310. This solved the EDB problem permanently (no need to enable EDB in bios anymore). The brightness problem is still pending.
Cheers,
EW
November 2nd, 2009 at 1:23 pm
Stuart,
I have been reading that the new 10.6.2 update with removing support for Atom CPUs and Intel 950 GMA support.
Do you know if the new system update has affected your system if you are on SL or anybody elses system that has SL and on NC10 or MSIWind?
I hope to hear from you soon.
All the best
NSCXP2005
November 2nd, 2009 at 6:17 pm
NSCXP2005, having read your comment I’ve found this article:
http://osxdaily.com/2009/10/31/hackintosh-netbook-users-take-note-snow-leopard-10-6-2-update-kills-support-for-atom-processor/
So we are talking a pre-release beta build here – but then, I’m surprised that Apple hasn’t moved against the hackintosh community before now.
It won’t lose GMA950 support, though – there are still shed-loads of (original) MacBook Air and pre-nVidia Mac Mini owners out there.
I’m sure there will always be fixes (10.6.x userspace on 10.6.1 kernel, custom kernel modifications, etc.) so the game’s not up… but the barrier to entry just got that much higher.
There’s always Ubuntu
November 10th, 2009 at 8:32 pm
Confirmed 10.6.2 update breaks Atom processors…
http://www.mobilecomputermag.co.uk/news/20091110/confirmed-mac-os-does-not-support-the-intel-atom-processor
November 11th, 2009 at 1:02 am
Stuart… please pardon my ignorance here but I’m trying to connect a digital projector to this NC-10 (10.5.6) and am having no luck whatsoever. Has there been a suggestion or fix posted on how this is done, please? I wish to be showing on the screen the same thing that is on the NC-10 screen.
Larry
November 11th, 2009 at 9:50 am
Larry, Yeah – it looks as if Apple has put a stop to this one. It may be possible to perform the 10.6.2 upgrade but then restore a copy of the old 10.6.1 kernel (because even with fixes, I doubt that the kernel API is different) – but even if it works (and it may well not) it’s an additional hurdle.
Unfortunately, I don’t think that you’re going to have any luck with the projector – I’ve not come across any GMA950 driver which works in Mirror-mode. You can have your projector running as a separate display alongside the built-in panel, but as soon as you switch to Mirrored mode (which is what you want) the output will corrupt on both displays. The problem then is that you can’t see anything with the external display connected, yet the option disappears when the display is disconnected (but at least you can see again).
When testing, I removed Mirrored mode by disconnecting the display and turning on keyboard-navigation and Voice Over, and then tabbing around the Displays Preferences pane to see what it sounded like, then plugging in the external monitor (corrupting the display) and navigating by ear(!) until I found the Mirror check-box and disabling it.
I think that the best you’ll be able to do without Apple hardware is to run with two separate displays, and then drag the windows of interest from the internal panel to the projector display.
November 18th, 2009 at 10:16 pm
Hi stuart. I only have assess to a mac and i am having a hard time trying to figure out how to preparing the boot device on osx. I am a bit of a newb to this stuff. also when ever i try to boot from a usb on my nc10 (running ubuntu) all i get is a blank screen with a flashing cursor in the top left corner of the screen. its all a bit puzzling.
Any help you could provide would be much appreciated.
thanks.
November 20th, 2009 at 4:36 pm
Thank you for your reply, Stuart.
December 2nd, 2009 at 7:02 pm
I’m trying this with my N110. Although mine is running the N280 @ 1.6Ghz. All was going well, I’d created a USB drive imaged with 10.5.6 copied from a Mac using Disk Utility, another USB with the boot loader. I get to the point where Darwin is loading, a grey screen with the Apple logo appears for about 2 seconds, before the whole system reboots.
Any ideas what could be causing the sudden reboot?
Any help would be ace.
December 3rd, 2009 at 9:57 pm
Rob, have you enabled EDB (as it’s referred to within the NC10’s BIOS – it might also be called eXecute Disable or No-eXecute) in your BIOS? Without this CPU feature enabled, Mac OS does reset during boot as you describe.
If this doesn’t help then you could try booting by typing ‘-v‘, which should produce verbose output. You’ll have to be quick, but the final output before the system reboots might be significant…
January 10th, 2010 at 1:51 pm
Tried the procedure on a Zotac Ion mb with Atom 330. EDB was enabled, but the system got caught in a reboot loop – same as Rob’s. I was using the installer from the link you supplied early in the article. The Mac OS was “restored” onto a USB harddisk from a retail Leopard DVD.
Using -v I can see Darwin loading HFS+ files etc but it was going too fast to read what was being done just before the screen went blank and the system rebooted. By the way the ? switch was not recognized.
February 4th, 2010 at 4:36 pm
Hi,
I have followed instructions carefully and boot up with two USBs in my NC10. One with the boot files created as above and one with the OSX intall disc restored to it using diskutility. When I boot I get a “Invalid system disk” error.
What am I doing wrong?
Thanks
Mischa